
Wie man Boulderopal schneidet und poliert
 In diesem Leitfaden zeigen wir Ihnen einige Tricks zum Schleifen von australischem Boulderopal. Boulderopal ist ein Opal mit einem harten, aus Eisenstein bestehenden Trägermaterial, das mit Edelopal durchzogen ist. Der Edelopal kann eine dünne Schicht auf dem Eisenstein bilden oder in diesen eingebettet sein.
Australischer Boulderopal aus Queensland ist ein faszinierender Stein. Das Schleifen von Boulderopalen ist eine Herausforderung, doch die Ergebnisse sind meist atemberaubend, da das Material so hart ist, dass Schnittfehler kaum möglich sind. Daher eignet sich diese Materialart sowohl für Anfänger als auch für erfahrene Schleifer.
Lasst uns mit einer grundlegenden Übersicht zum Schleifen und Polieren von Boulderopal beginnen.

Benötigte Ausrüstung:
- Dop-Sticks
- Dop-Wachs oder starker Kleber
- Trimm-Säge mit dünner
- Klinge (mit einer Randstärke von ca. 0,02 Zoll)
- Diamantschleifscheiben mit den Körnungen 80, 220, 600, 1200 und 3000
- Schneidgeräte
- Raues Leder
- Polierscheibe
- Zinnoxid-Politur
- Lampe mit 100-Watt-Glühbirne
- Schutzbrille
- Staubmaske
- Alte Arbeitskleidung
- Wasserversorgung


Vorbereitung des Rohmaterials:
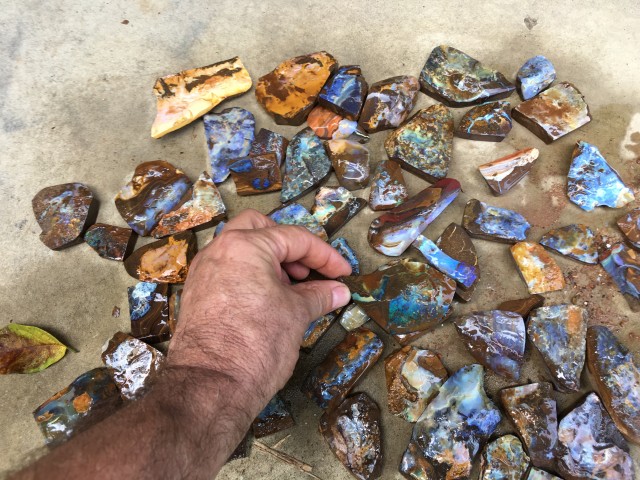
1. Opale von Hand auswählen
Suchen Sie sich die Opale aus, die Sie polieren möchten. Es ist effizienter, mehrere Steine gleichzeitig zu bearbeiten, da Sie die Maschine nur einmal einrichten müssen. Die Auswahl von Boulderopalen erfordert Geschick. Wie bei jedem Rohmaterial gilt: Je mehr Erfahrung Sie sammeln, desto besser. Achten Sie darauf, dass das Eisengestein um den Opal herum relativ fest und rissfrei ist. Ein minderwertiges Material eignet sich gut zum Üben. Sie erhalten vielleicht keinen wunderschönen Stein, aber Sie können Ihre systematische Fertigkeit so weit entwickeln, dass Sie auch einen attraktiven Stein nach Ihren Wünschen bearbeiten können.


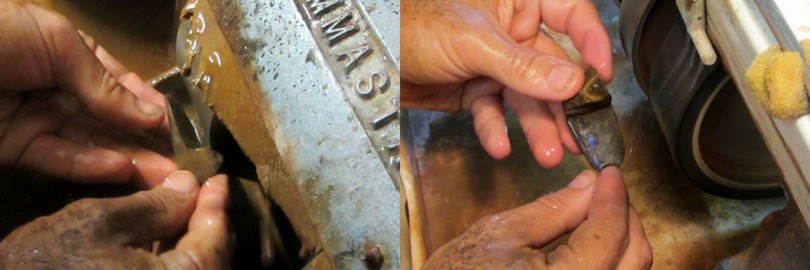
2. Untersuche den Opal und zersäge ihn.
Achten Sie auf die Struktur des Eisengesteins, um Hinweise auf den Verlauf der Opalader zu erhalten. Wenn Opal in Eisengestein vorkommt, bildet er flache, gerade und parallele Linien entlang der Matrix. Die Wahrscheinlichkeit ist höher, dass der Opal dieser Linie folgt. Falls das Rohmaterial in Wasser eingeweicht wurde, lassen Sie es zunächst trocknen, damit Sie den Verlauf des Opals erkennen können. Prüfen Sie das Gestein auf Risse und andere Unregelmäßigkeiten. Falls Risse im Gestein vorhanden sind, können Sie den Opal entlang dieser Risse mit einer Säge spalten. Dadurch vermeiden Sie spätere Probleme.
Das meiste Rohmaterial, das Sie kaufen werden, ist bereits zu Platten geschnitten, sodass die Opalschicht deutlich sichtbar ist. Sollte das Material völlig roh sein und der Opal nicht gut erkennbar sein, müssen Sie den Stein sägen, um die Opalschicht freizulegen.
Das Sägeblatt sollte stets unter Wasser sein. Verwenden Sie reichlich Wasser, um die Staubentwicklung zu binden und den Opal zu kühlen. Schneiden Sie niemals trocken, da Opal sich schnell erhitzt und reißt.

3. Mit einer groben Trennscheibe Material abtragen.
Jetzt kommt der spaßige Teil. Sie brauchen alte Kleidung, da die Arbeit schmutzig werden wird. Nachdem Sie nun eine ungefähre Vorstellung vom Verlauf der Naht haben, können Sie sie abschleifen. Eine Kombination aus 80er- und 220er-Schleifscheibe erleichtert das Abschleifen des Opals erheblich. Verwenden Sie die grobe Schleifscheibe, um schnell Material abzutragen. Achten Sie darauf, nicht zu nah an die Opallinie zu kommen. Die Opalschicht kann uneben sein, daher sollten Sie knapp über der Schicht bleiben.
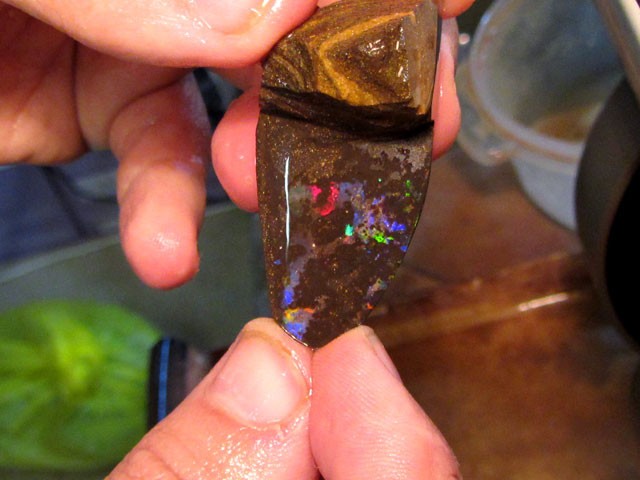
4. Studieren und machen Sie sich mit dem Opal vertraut.
Nun ist es an der Zeit, sich mit dem Opal vertraut zu machen. Sie müssen entscheiden, welche Seite oben liegen soll. Berücksichtigen Sie dabei die Form und Schichtung des Opals sowie die Farbe, Helligkeit und Breite des umgebenden Materials.
Achten Sie darauf, dass das Material direkt unter dem Opal so dunkel wie möglich ist. Durch diese dunkle Umgebung kommen die Farben des Opals besonders gut zur Geltung. Eine dünne Schicht aus dunklem Potch zwischen der Opalreihe und dem Eisenstein verstärkt diesen Effekt. Schneiden Sie den Stein so, dass diese schwarze Schicht den Hintergrund für den Opal bildet.
Diese Art von Stein wird als schwarzer Boulderopal bezeichnet und kann sehr strahlend sein. Wichtig ist auch, dass der Boulderopal eine feste Basis besitzt. Ist das Eisengestein auf der anderen Seite des Opals zu dünn, bietet es nicht die nötige Stabilität für den Boden des Steins.

5. Reiben Sie den Eisenstein ab.
Nachdem Sie die Ausrichtung des Opals bestimmt haben, verwenden Sie die Schleifscheiben mit 220er und 280er Körnung. Vermeiden Sie jeglichen Kontakt mit dem Opal, sobald Sie die 220er-Schleifscheibe verwenden, da diese schnell einen Großteil der leuchtenden Farben abtragen kann.
Es empfiehlt sich, mit leichtem Druck, beginnend mit einer 220er-Körnung, zu schleifen, je näher man dem Opal kommt. Man muss so lange Eisenstein abtragen, bis man an einer Stelle der Oberfläche fast den Opal freigelegt hat. Manchmal bemerkt man sogar, dass sich die Farbe des Eisensteins verändert, bevor man den Opal erreicht.
6. Durch Abreiben wird der Opal freigelegt.
Wechseln Sie zur 600er-Schleifscheibe, um etwas Opal freizulegen. In dieser Phase geht es nicht darum, das gesamte Eisengestein von der Oberfläche zu entfernen. Dies erreichen Sie, indem Sie mit mittlerem Druck zwischen der 600er-Schleifscheibe und der 280er-Schleifscheibe hin und her wechseln. Üben Sie dabei nur leichten Druck aus. Sobald Sie die Beschaffenheit der Opalschicht erkannt haben, können Sie die Bearbeitung der Oberfläche einstellen.

Schneiden und Polieren des Opals:
Die Polierarbeiten beginnen mit Diamantscheiben der Körnung 120, gefolgt von Gummischeiben mit den Körnungen 400, 600 und 1400 vor dem finalen Polieren.
1. Dop The Opal
Zuerst muss der Stein auf einen Polierstab aufgebracht werden. Auf dem Polierstab lässt er sich leichter bearbeiten und formen. Verwenden Sie die 220er-Schleifscheibe, um die Rückseite des Steins zu glätten. Opale werden üblicherweise mit Klebstoff oder Wachs poliert.

2. Kleber
Die Unterseite des Steins muss sauber und trocken sein. Geben Sie ein bis zwei Tropfen Klebstoff auf die Dop-Sticks. Erwärmen Sie den Opal vor, indem Sie ihn maximal 30 Sekunden lang auf den Rand des Dop-Topfes legen.
Drücken Sie den Opal mit leichtem Druck in den Klebestift. Der Kleber trocknet nach etwa 30 Minuten. 
3. Wachs
Wenn die Rückseite des Opals schwammig ist und der Kleber nicht hält, können Sie alternativ Wachs verwenden. Erhitzen Sie den Opal und tropfen Sie geschmolzenes Wachs darauf, bevor Sie ihn auf die Klebestäbchen aufbringen. Achten Sie darauf, dass die Klebestäbchen ausreichend mit Wachs bedeckt sind.

2. Richten Sie Ihr Bewässerungssystem ein.
In diesem Schritt können Sie den Opal schleifen. Wenn Sie ein Gerät verwenden, das das Wasser umwälzt, beispielsweise das Wasser, das auf die Schleifscheiben gesprüht wird, können Sie es in eine Schale tropfen lassen, von dort herausdrücken und erneut auf die Schleifscheiben sprühen. Wechseln Sie das Wasser regelmäßig und reinigen Sie die Schalen gründlich.

3. Vorbereitungsphase – Entscheidungen treffen
An diesem Punkt müssen Sie einige wichtige Entscheidungen treffen. Betrachten Sie das Gesamtbild Ihres Steins, sowohl des Eisensteins als auch des Opals. Ihre Kombination kann sehr schön sein.
Fahren Sie fort, Eisenstein mit der 600er-Schleifscheibe zu entfernen. Achten Sie darauf, den Stein in Bewegung zu halten. Die 600er-Schleifscheibe kann weiterhin Opal abtragen und glatte Stellen sowie Kratzer erzeugen. In dieser Schleifphase können Sie viele Arbeiten erledigen. Sie beseitigen Kratzer aus vorherigen Arbeitsschritten.
Anschließend wird das Eisengestein von der Oberfläche entfernt, und die Oberfläche und Form des Steins wirken ansprechend. Betrachten Sie Ihren Stein und achten Sie auf seine Wirkung. Gegebenenfalls müssen Sie mit der 280er-Schleifscheibe nacharbeiten, um die Form zu korrigieren. Sobald Sie die gröbsten Kratzer entfernt haben und mit dem Ergebnis zufrieden sind, verwenden Sie die 1200er-Schleifscheibe.

4. Die Form finalisieren und den Opal freilegen
In diesem Schritt entfernt die 1200er-Schleifscheibe fast alle sichtbaren Kratzer. Sie verändert die Form des Steins zwar nicht wesentlich, kann sie aber verbessern. Üben Sie mäßigen Druck aus und achten Sie darauf, dass der Stein ständig bewegt wird.
Unterbrechen Sie den Vorgang regelmäßig und reinigen Sie den Stein, um den Fortschritt zu überprüfen und sicherzustellen, dass die Kratzer vollständig verschwinden.
Sobald die sichtbaren Kratzer entfernt sind, verwenden Sie die 3000er-Schleifscheibe. Falls Sie keine 3000er-Schleifscheibe verwenden, beginnen Sie mit der Reinigung des Steins. Wenn Ihr Gerät über eine 14000er-Schleifscheibe verfügt, ist es ratsam, keinen Boulderopal zu bearbeiten, da diese oft bereits Kratzer aufweist.
5. Abschließender Feinschliff
Im nächsten Schritt wird poliert. Um dem Leder Glanz zu verleihen, kann man Zinnoxid zum Reinigen des mit Schaumstoff unterlegten, rauen Lederpads verwenden. Dazu befeuchten Sie es einfach leicht mit Wasser aus einer Sprühflasche und polieren es anschließend mit dem Poliergerät, wobei das Pad rotiert.
Tragen Sie anschließend mit einem Pinsel eine gut verrührte Mischung aus Wasser und Zinnoxid auf das angefeuchtete Pad auf. Die Mischung muss so dünnflüssig sein, dass sie nicht klumpt und die Konsistenz einer dünnen Soße hat.

Bewegen Sie die Opale regelmäßig, indem Sie den Applikator zwischen Ihren Fingern drehen und die Position des Pads variieren. Achten Sie darauf, dass der Opal nicht zu heiß wird. Manchmal kann das raue Lederpad den Stein festklemmen und ihn aus der Hand ziehen. Dies geschieht meist, wenn das Pad ausgetrocknet ist oder der Stein eine raue Oberfläche oder gar spitze Kanten hat.

6. Eine Anmerkung zum Matrix-Boulder-Opal
Wenn Sie einen Matrixopal polieren möchten, gehen Sie genauso vor. Der Opal lässt sich in der Regel polieren, die Eisensteinmatrix hingegen bleibt trocken. Reinigen Sie den Opal wie beschrieben und lassen Sie das Polierpad anschließend leicht antrocknen. Üben Sie dabei etwas mehr Druck aus und bewegen Sie den Stein dabei, bis er sich erwärmt hat.
Denken Sie daran, dass Sie die Matrix reinigen, nicht die Opalflecken Ihres Steins. Seien Sie vorsichtig beim Erhitzen des Steins entlang des Polierpads, da dies die Oberfläche der Matrix verändern kann. Zu viel Hitze kann den Opal jedoch beschädigen. Diese Methode erfordert etwas Übung, aber das Ergebnis kann sich lohnen.
7. Die Rückseite des Steins fertigstellen
Zum Schluss können Sie die Rückseite bearbeiten. Sobald Sie mit dem Polieren fertig sind, nehmen Sie den Stein vom Trägerstift. Verwenden Sie leichten bis normalen Druck mit einer Körnung von etwa 220–280, um eventuelle Rückstände des Trägermaterials zu entfernen.
Halten Sie den Stein flach auf der Schleifscheibe, drehen Sie ihn aber leicht, um Kratzer auf der Rückseite zu vermeiden. Wählen Sie nun die gewünschte Größe des Steins. Sobald Sie die passende Dicke erreicht haben, verwenden Sie eine 220er oder 280er Körnung für die Schleifscheibe, um Ausbrüche beim Fassen zu minimieren.
Man kann den Opal entweder als fertig bearbeitet betrachten oder ein noch feineres Finish erzielen, indem man die Rückseite durch die verbleibenden, feineren Schleifscheiben führt. Die Rückseite der Steine muss mit Schleifscheiben der Körnung 1200 oder 3000 bearbeitet werden.
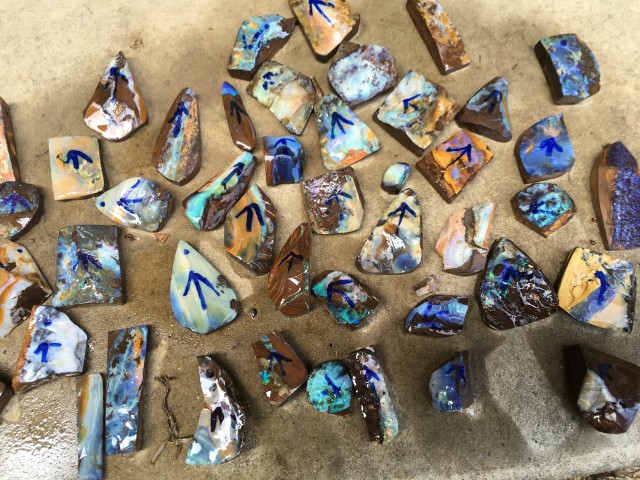
8. Das fertige Produkt
Nachdem alle Opale geschliffen und poliert wurden, können sie sortiert und klassifiziert werden.
Boulderopale eignen sich hervorragend für Anhänger. Man benötigt lediglich eine Bohrmaschine, um ein Loch in die Spitze zu bohren. Fädelt man das Loch durch ein Lederband, erhält man eine wunderschöne Boulderopal-Halskette.

Ein praktischer Tipp vom Opalschleifer
Sie befürchten, Ihre Maschine mit nassen Händen ein- und auszuschalten? Kleben Sie doch einfach einen Spachtel auf den Netzschalter. So kommt nichts Nasses mit Strom in Berührung. Genial!

Kaufen Sie Boulder-Rough

Suche nach Opal Encyclopedia
Verwandte Auktionen

![32.10 CTS BOULDER OPAL STONE FROM WINTON [BMA8200]](https://liveplatforms-production.b-cdn.net/tenants/oa/uploads/images/810000-814999/812023/5d79ccb20b34b.jpg?width=480&aspect_ratio=1001%3A1000)

Prämie

In Verbindung stehende Artikel
Die NASA entdeckte zunächst Opal auf dem Mars und hat nun bestätigt, dass es dort fließendes Wasser gibt. Erfahren Sie, wie die beiden Entdeckungen zusammenhängen.
22nd Jun 2017
Ich besuchte eine neue Opalmine in Banten, unweit von Jakarta, Indonesien. Opal wurde hier 1995 entdeckt, und seitdem gab es unterschiedliche Produktionsniveaus.
8th May 2018
Monarch-Opal oder Sterling-Opal ist eine neue Art synthetischer Opale, die von demselben Entwickler hergestellt wird, der auch das Zachery-Verfahren für Türkis entwickelt hat. Erfahren Sie mehr über das einzigartige Aussehen und die Erkennungsmöglichkeiten dieses Opals.
29th Nov 2018
Neue Artikel
Schwarze Opale sind die begehrteste Opalart. Ihre tiefe Basis erzeugt ein regenbogenfarbenes Farbenspiel an der Oberfläche. Entdecken Sie die Verwendung, Eigenschaften, Geschichte und den Wert schwarzer Opale!
7th Dec 2025
Erfahren Sie, wie Opale bewertet werden und welche Faktoren ihren Preis beeinflussen. Von Farbe und Leuchtkraft bis hin zu Schliff und Herkunft – lernen Sie, wie die verschiedenen Opalarten bewertet werden, inklusive Preisbeispielen.
19th Jul 2023
Begeben Sie sich auf eine Reise und erfahren Sie von unserer Gastautorin Vivien Schapera von Crystal Healing Techniques mehr über die Heilkraft von Opalen!
20th May 2023
Artikelkategorien
All there is to know about Opals including Black Opals, Ethiopian Opals & Boulder Opal
14 Artikel
Check out our fascinating information and articles on all things amazing in the Opal world
41 Artikel
Opal Auctions sellers who are approved as opal Verified Sellers
4 Artikel