
Come tagliare e lucidare l'opale Boulder
 In questa guida vi mostreremo alcuni trucchi per tagliare l'opale Boulder australiano. L'opale Boulder è un opale con un supporto rigido in pietra di ferro e opale prezioso. L'opale prezioso può essere uno strato sottile sopra la pietra di ferro o può essere intrecciato con essa.
L'opale boulder australiano del Queensland è una pietra affascinante. Tagliare l'opale boulder è una sfida, ma i risultati sono solitamente mozzafiato perché il materiale è così duro che è difficile commettere errori di taglio, quindi questo tipo di materiale è adatto sia ai tagliatori principianti che a quelli esperti.
Diamo ora una panoramica di base su come tagliare e lucidare l'opale boulder.

Attrezzatura necessaria:
- Bastoncini Dop
- Cera Dop o colla forte
- Sega da rifinitura con lama sottile
- Lama (con spessore del bordo di circa 0,02")
- Mole diamantate da 80, 220, 600, 1200 e 3000 grane
- Attrezzatura da taglio
- Pelle grezza
- Disco lucidante
- Lucidatura all'ossido di stagno
- Lampada con lampadina da 100 watt
- occhiali di sicurezza
- Maschera antipolvere
- Vecchi abiti da lavoro
- Approvvigionamento idrico


Preparazione del materiale grezzo:
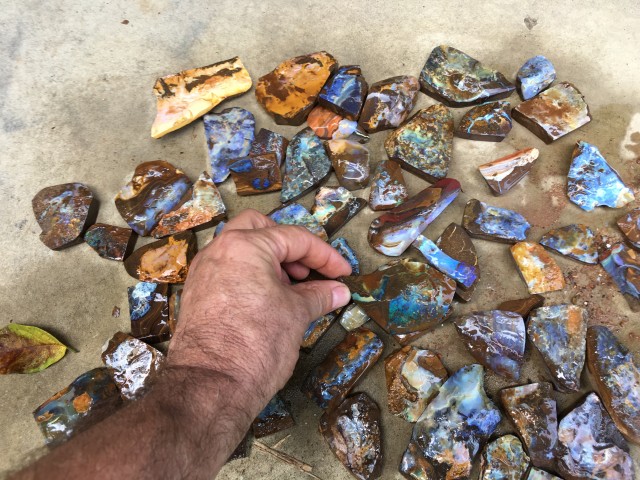
1. Scegli a mano i tuoi opali
Scegli il tipo di opale che desideri lucidare. È più efficiente tagliare più pietre contemporaneamente, poiché dovrai impostare la macchina una sola volta. Selezionare l'opale boulder da lavorare è un'abilità a sé stante. Come per qualsiasi altro materiale grezzo, più ne sai, meglio è. Assicurati che la pietra ferrosa attorno all'opale sia abbastanza resistente e priva di crepe. Un materiale di qualità relativamente bassa è un buon punto di partenza. Potresti non ottenere una pietra bellissima, ma puoi sviluppare la tua abilità sistematica abbastanza da essere in grado di tagliare quella pietra attraente nel modo che desideri.


2. Studia l'opale e segalo
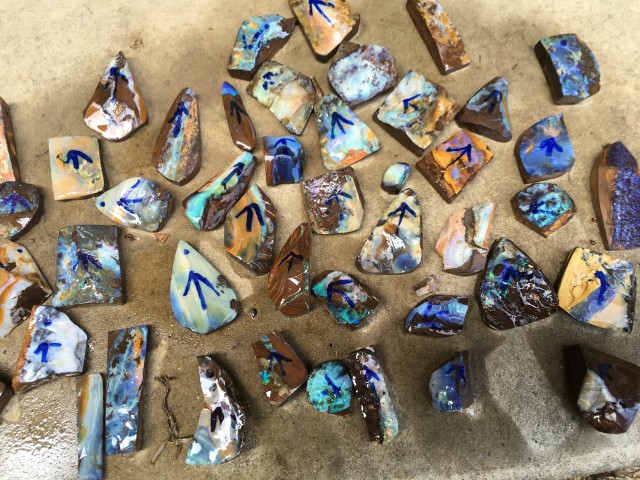
Osserva il disegno della pietra di ferro per avere qualche indizio sul percorso della venatura. Quando l'opale si trova nella pietra di ferro, presenta linee parallele piatte e dritte lungo la matrice. Ci sono maggiori probabilità che l'opale segua questa linea. Se il grezzo è immerso in acqua, lascialo asciugare prima in modo da poter vedere dove si sta muovendo l'opale. Controlla la presenza di crepe che attraversano la pietra e di nuovo cerca eventuali imperfezioni. Se ci sono crepe che attraversano la pietra, puoi usare la sega per dividere l'opale lungo la crepa. Questo eviterà problemi in seguito.
La maggior parte del materiale grezzo che acquisterai è già stato tagliato in lastre, in modo da poter vedere chiaramente lo strato di Opale. Se il materiale è completamente grezzo e non riesci a vedere facilmente l'Opale, dovrai segare la pietra per esporre lo strato di Opale.
La lama della sega deve essere sempre immersa nell'acqua. Utilizzare abbondante acqua per tenere lontana la polvere e raffreddare l'opale. Non tagliare mai a secco, poiché l'opale si riscalda rapidamente e si crepa.

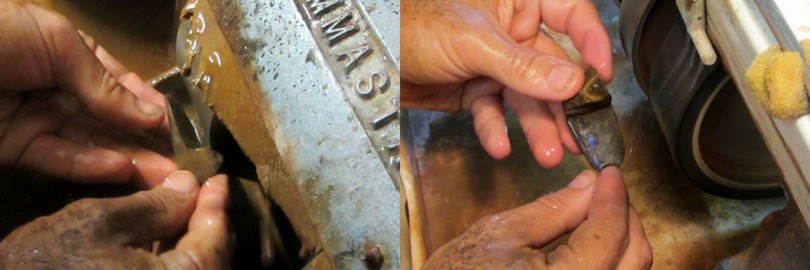
3. Utilizzare una mola da taglio grossolana per rimuovere il materiale
Ora arriva la parte divertente. Avrai bisogno di un cambio di vestiti vecchi perché si sporcherà. Ora che hai una buona idea di come si svilupperà la cucitura, è il momento di levigarla. Avere una combinazione di ruote a grana 80 e 220 può rendere la levigatura dell'opale molto più semplice. Usa la ruota a grana grossa per rimuovere rapidamente il materiale. Cerca di non avvicinarti troppo alla linea dell'opale. Lo strato di opale può essere imprevedibile, quindi cerca di rimanere appena sopra lo strato.
4. Studia e familiarizza con l'opale
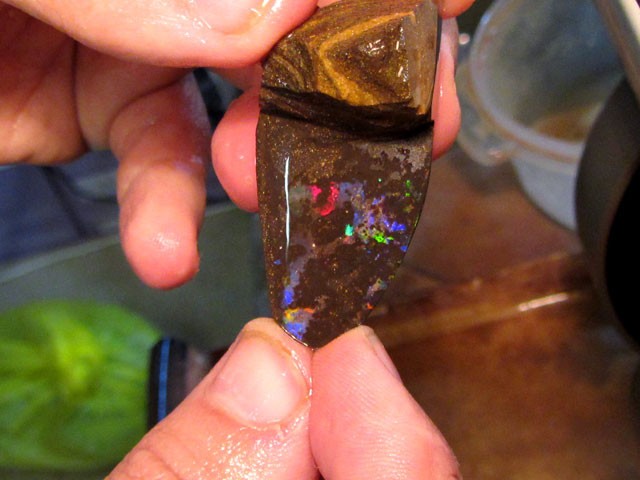
Ora è il momento di familiarizzare con l'opale. Devi decidere quale sarà la superficie superiore. Basa il tuo giudizio sulla forma e sullo strato dell'opale, sulla colorazione, sulla luminosità e sullo spessore del materiale circostante.
Assicuratevi che il materiale direttamente sotto l'opale sia il più scuro possibile. Questa incastonatura scura farà risaltare i colori dell'opale. Se c'è un sottile strato di potch scuro tra la fila di opale e la pietra di ferro, la pietra risalterà. Dovete cercare di tagliare la pietra in modo che questo rivestimento nero faccia da sfondo alla vostra pietra.
Questo tipo di pietra è chiamato "boulder nero" e può essere piuttosto radioso. È inoltre importante che l'opale "boulder" abbia una base solida. Se la pietra di ferro sulla superficie dell'opale è troppo sottile, non offrirà la resistenza necessaria per la base della pietra.

5. Strofinare via la pietra di ferro
Ora che sai in che direzione sarà rivolto l'opale, usa la mola abrasiva con grana 220 e 280. Non devi entrare in contatto con l'opale una volta che hai deciso di usare la mola abrasiva con grana 220, perché può eliminare rapidamente una buona parte dei materiali vibranti.
Si consiglia inoltre di esercitare una leggera pressione con una mola a grana 220 man mano che ci si avvicina all'opale. È necessario continuare a rimuovere la pietra ferrosa finché non si è quasi in grado di vedere l'opale in una parte della superficie. Occasionalmente, prima di raggiungere l'opale, si noterà persino un cambiamento di colore della pietra ferrosa.
6. Strofinare per esporre l'opale
Passa alla mola a grana 600 per esporre un po' di opale. In questa fase, non stai cercando di eliminare tutto il minerale di ferro dalla superficie. Puoi farlo passando più volte sulla mola a grana 600 con una pressione media. Esercita una pressione leggera sulla mola a grana 280. Una volta che hai capito come funziona lo strato di opale, puoi smettere di lavorare sulla superficie.

Taglio e lucidatura dell'opale:
Le mole lucidanti partono da una grana diamantata 120, per poi passare alle mole in gomma da 400/600/1400 prima della lucidatura finale.
1. Dop The Opal
Per prima cosa dobbiamo posizionare la pietra su un bastoncino per doping. Quando la pietra è sul bastoncino, è più facile da maneggiare e modellare. Usate la mola a grana 220 e appiattite il lato posteriore. I due metodi più comuni per doping di un opale sono con la colla o con la cera.

2. Colla
La base della pietra deve essere pulita e asciutta. Applicare una o due gocce di colla sui bastoncini di dop. Preriscaldare l'opale appoggiandolo sul bordo del contenitore di dop per non più di 30 secondi.
Esercitare una leggera pressione per spingere l'opale nel bastoncino di colla. La colla si asciugherà dopo circa 30 minuti. 
3. Cera
Se il retro dell'opale è spugnoso e la colla non funziona, puoi usare la cera come alternativa. Riscalda l'opale e versa della cera fusa sull'opale prima di applicarla sui bastoncini di dop. Assicurati che i bastoncini di dop abbiano una quantità sufficiente di cera fusa.

2. Imposta il tuo sistema di irrigazione
Questo è il passaggio in cui puoi tagliare l'opale. Se utilizzi un dispositivo che ricircola l'acqua, come quella che viene spruzzata sulle ruote, puoi farla gocciolare in una bacinella, quindi forzarla a uscire da quella bacinella e spruzzarla nuovamente sulle ruote. Cambia regolarmente l'acqua e pulisci le bacinelle dallo sporco.

3. Pre-Form - Prendi le decisioni
A questo punto, è necessario prendere alcune decisioni importanti. Osservate l'aspetto generale della vostra pietra, sia l'ironstone che l'opale. La loro combinazione può essere piuttosto bella.
Continua a eliminare il minerale di ferro con la mola a grana 600. Ricordati di continuare a muovere la pietra. La mola a grana 600 può ancora ridurre l'opale e creare punti lisci e graffi. Puoi fare molte cose durante questa fase di taglio. Stai eliminando i graffi delle fasi precedenti.
Quindi, eliminando il minerale di ferro dalla superficie e migliorando la superficie e la forma della pietra, si ottiene un risultato gradevole alla vista. Controlla la pietra e osserva cosa mostra. Potrebbe essere necessario tornare alla mola a grana 280 e modificarne la forma. Una volta eliminati i graffi più evidenti e ottenuto un risultato soddisfacente, passa alla mola a grana 1200.

4. Finalizza la forma ed esponi l'opale
In questa fase, la mola a grana 1200 eliminerà quasi tutti i graffi visibili. Non modificherà molto la forma della pietra, ma può migliorarla. Esercitate una pressione ragionevole e assicuratevi che la pietra sia in continuo movimento.
Fermatevi regolarmente e pulite la pietra per verificare i progressi e assicurarvi che i graffi siano completamente scomparsi.
Una volta rimossi i graffi evidenti, passa alla mola a grana 3000 o, se non ne usi una, inizia a pulire la pietra. Se il tuo dispositivo è dotato di una mola a grana 14.000, è consigliabile non tagliare l'opale boulder. Questa mola inizia spesso con dei graffi.
5. Lucidatura finale
La fase successiva è la lucidatura. Per farla brillare, potete usare l'ossido di stagno per pulire il cuscinetto in pelle ruvida con supporto in schiuma. Basta immergerlo leggermente in acqua utilizzando uno spruzzino e tenendo il cuscinetto in funzione e in rotazione.
Inoltre, utilizzare un pennello per applicare una miscela ben mescolata di acqua e ossido di stagno sul tampone umido. Da qui, la miscela di acqua e ossido di stagno deve essere sufficientemente fluida da non formare grumi e avere l'uniformità di un sugo liquido.

Continuate a mescolare gli opali ruotando il bastoncino tra le dita e variando la posizione del cuscinetto. Non lasciate che l'opale diventi troppo caldo. A volte, il cuscinetto di pelle ruvida può incastrare la pietra e strapparla dalle mani. Questo accade solitamente perché il cuscinetto si è asciugato o se la pietra ha una superficie ruvida o addirittura bordi appuntiti.

6. Una nota sull'opale Matrix Boulder
Se decidete di lucidare un opale matrice, potete seguire lo stesso procedimento. L'opale solitamente si lucida, ma la matrice di minerale di ferro sarà asciutta. Un metodo utile è pulire l'opale come spiegato e poi lasciare asciugare leggermente il tampone. Esercitate maggiore forza mentre mantenete la pietra in movimento, in modo da percepire che la pietra si riscalda in modo uniforme.
Ricorda che stai pulendo la matrice, non le macchie di opale della tua pietra. Fai attenzione quando riscaldi la pietra lungo il tampone lucidante, perché questo può alterare la finitura della matrice, ma ricorda che troppo calore può rompere l'opale. Questo metodo richiede un po' di pratica, ma i risultati possono valerne la pena.
7. Rifinire il retro della pietra
Infine, puoi procedere con la finitura del retro. Una volta completata la lucidatura, togli la pietra dal suo supporto. Puoi applicare una pressione leggera o normale con una grana di circa 220-280 per rimuovere eventuali residui di prodotto.
È necessario mantenere la pietra piatta contro il disco, ma ruotarla leggermente per evitare graffi sul retro. A questo punto, seleziona la dimensione che preferisci per la pietra. Una volta ottenuto lo spessore adatto, applica la grana 220 o 280 al disco, che può aiutare a ridurre al minimo le scheggiature durante l'incastonatura.
Si può pensare che l'opale sia già completato, oppure ottenere un aspetto più rifinito passando il retro della pietra attraverso la catena rimanente di mole più fini. La parte posteriore della pietra deve essere tagliata con mole a grana 1200 o 3000.
8. Il prodotto finito
Dopo che tutti gli opali sono stati tagliati e lucidati, possono essere selezionati e classificati.
Gli opali boulder sono perfetti per realizzare pendenti. Tutto ciò che serve è un trapano a colonna per creare un foro sulla punta. Infilateli in un laccetto di cuoio e avrete una splendida collana di opali boulder.

Un consiglio utile da un tagliatore di opali
Hai paura di accendere e spegnere la lavatrice con le mani bagnate? Prova ad incollare un bastoncino di resina epossidica all'interruttore del quadro elettrico. In questo modo, niente di bagnato entrerà mai in contatto con la corrente. Fantastico.

Acquista Boulder Rough

Cerca il Opal Encyclopedia
Aste correlate


![39.00 CTS BOULDER WOOD FOSSIL STONE -PIPE OPAL [BMA9570]](https://liveplatforms-production.b-cdn.net/tenants/oa/uploads/images/885000-889999/889824/5ebcbc5438c8d.jpg?width=480&aspect_ratio=1001%3A1000)
![$1.39 PER CTS 55.95 CTS DRILLED BOULDER OPAL-WELL POLISHED [BMA9450]](https://liveplatforms-production.b-cdn.net/tenants/oa/uploads/images/870000-874999/873671/5e83e1ac14dc0.jpg?width=480&aspect_ratio=1001%3A1000)
articoli Correlati
Tabella di conversione per le misure degli anelli
17th Jul 2018
L'opale Boulder è uno degli opali più sottovalutati sul mercato. Scopri di più su questo opale unico e scopri le splendide pietre che abbiamo in vendita.
29th May 2019
Con la passione per gli opali, Wayne ed Estella Sedawie hanno fondato Opal Plus più di 14 anni fa e hanno scoperto che internet è uno strumento prezioso. È qui che avviene la maggior parte delle transazioni internazionali dell'azienda.
17th Oct 2018
Articoli Recenti
Gli opali neri sono la varietà di opale più ricercata, con basi profonde che conferiscono un arcobaleno di riflessi alla superficie. Scopri gli usi, le proprietà, la storia e il valore degli opali neri!
7th Dec 2025
Scopri come vengono classificati gli opali e quali fattori ne influenzano il prezzo. Dal colore alla brillantezza, dal taglio all'origine, scopri come viene valutato ogni tipo di opale, con esempi di fasce di prezzo.
19th Jul 2023
Venite a scoprire il potere curativo degli opali con la nostra scrittrice ospite Vivien Schapera di Crystal Healing Techniques!
20th May 2023
Categorie di articoli
All there is to know about Opals including Black Opals, Ethiopian Opals & Boulder Opal
14 Articoli
Check out our fascinating information and articles on all things amazing in the Opal world
41 Articoli
Opal Auctions sellers who are approved as opal Verified Sellers
4 Articoli