
Hoe je Boulder Opaal snijdt en polijst
 In deze gids laten we je een paar handige tips zien voor het slijpen van Australische Boulder Opal. Boulder Opal is een opaal met een harde ondergrond van ijzersteen en edelopaal. De edelopaal kan een dunne laag vormen op de ijzersteen of verweven zijn met de ijzersteen.
Australische boulderopaal uit Queensland is een fascinerende steen. Het slijpen van boulderopaal is een uitdaging, maar de resultaten zijn meestal adembenemend. Het materiaal is zo hard dat er nauwelijks een snijfout te maken is. Dit type materiaal is daarom geschikt voor zowel beginnende als ervaren slijpers.
Laten we eens kijken naar de basisbeginselen van het snijden en polijsten van boulderopaal.

Benodigde uitrusting:
- Dop-sticks
- Dop wax of sterke lijm
- Afkortzaag met dunne
- Lemmet (met randdikte ongeveer 0,02 inch)
- Diamant slijpschijven 80, 220, 600, 1200 en 3000 korrel
- Snijapparatuur
- Ruw leer
- Polijstschijf
- Tinoxidepoets
- Lamp met 100 watt gloeilamp
- Veiligheidsbril
- Stofmasker
- Oude werkkleding
- Watervoorziening


Voorbereiding van het ruwe materiaal:
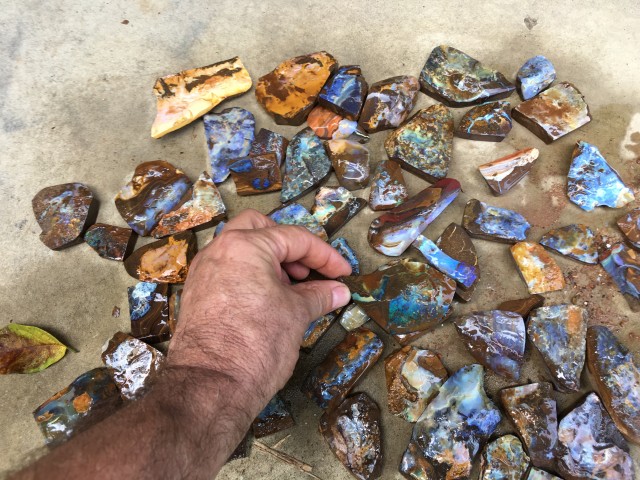
1. Kies uw opalen met de hand
Kies de opaalsoorten die u wilt polijsten. Het is efficiënter om meerdere stenen tegelijk te slijpen, omdat u de machine dan maar één keer hoeft in te stellen. Het selecteren van een opaal om mee te werken is een vak apart. Net als bij elk ander ruw materiaal geldt: hoe meer kennis u hebt, hoe beter. Zorg ervoor dat de ijzersteen rondom de opaal vrij sterk is en vrij van scheuren. Een materiaal van redelijk lage kwaliteit is een goede start. U krijgt misschien geen mooie steen, maar u kunt uw systematische vaardigheden zodanig ontwikkelen dat u die aantrekkelijke steen op elke gewenste manier kunt slijpen.


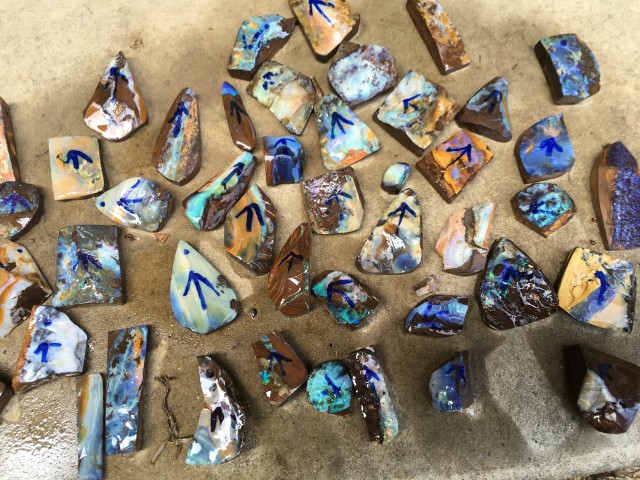
2. Bestudeer de opaal en zaag hem in stukken
Zoek naar het patroon van de ijzersteen om aanwijzingen te krijgen over het pad waarlangs de naad zal lopen. Wanneer opaal in ijzersteen voorkomt, heeft het vlakke en rechte, parallelle lijnen langs de matrix. De kans is groter dat de opaal deze lijn volgt. Als de ruwe steen in water is geweekt, laat deze dan eerst drogen zodat u kunt zien waar de opaal loopt. Controleer op scheuren in de steen en kijk opnieuw naar eventuele onvolkomenheden in de steen. Als er scheuren in de steen lopen, kunt u de opaal met de zaag door de scheur splijten. Dit voorkomt problemen in de toekomst.
Het meeste ruwe materiaal dat u koopt, is al in stukken gesneden, zodat u de opaallaag duidelijk kunt zien. Als het materiaal volledig ruw is en u de opaallaag niet gemakkelijk kunt zien, moet u de steen zagen om de opaallaag bloot te leggen.
Het zaagblad moet altijd onder water staan. Gebruik voldoende water om het stof te weren en de Opaal koel te houden. Zaag nooit droog, want Opaal zal snel opwarmen en barsten.

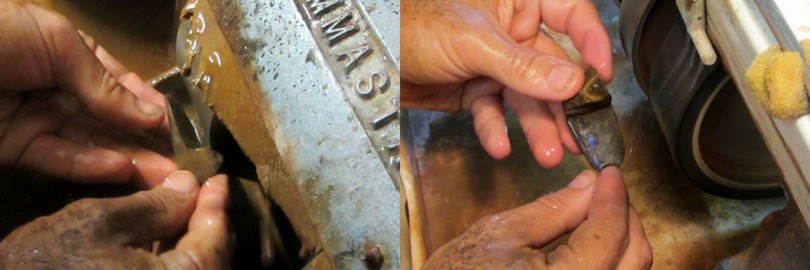
3. Gebruik een grof snijwiel om materiaal te verwijderen
Nu komt het leuke gedeelte. Je hebt een set oude kleren nodig, want het wordt vies. Nu je een redelijk idee hebt van de loop van de naad, is het tijd om hem op te schuren. Een combinatie van een schuurschijf met korrel 80 en 220 maakt het opschuren van de opaal veel gemakkelijker. Gebruik de grove schuurschijf om snel materiaal te verwijderen. Probeer niet te dicht bij de opaallijn te komen. De laag opaal kan onvoorspelbaar zijn, dus probeer net boven de laag te blijven.
4. Bestudeer en maak jezelf vertrouwd met de Opaal
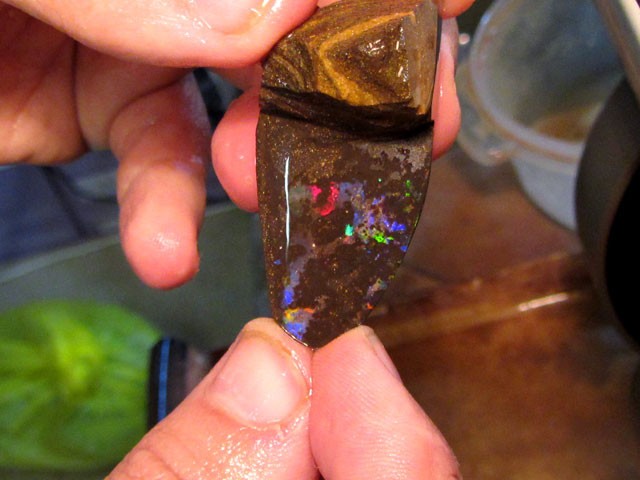
Nu is het tijd om de opaal te leren kennen. Je moet beslissen welk oppervlak het bovenste oppervlak wordt. Baseer je oordeel op de vorm en de laagdikte van de opaal, de kleur, helderheid en breedte van het omringende materiaal.
Zorg ervoor dat het materiaal direct onder de opaal zo donker mogelijk is. Deze donkere zetting zorgt ervoor dat de kleuren van de opaal goed tot hun recht komen. Een dunne laag donkere kalksteen tussen de rij opaal en de ijzersteen zal de steen extra laten opvallen. Probeer de steen zo te snijden dat deze zwarte coating de achtergrond voor uw steen vormt.
Dit soort steen wordt een zwarte zwerfsteen genoemd en kan behoorlijk stralend zijn. Het is ook belangrijk dat de zwerfsteen een stevige basis heeft. Als de ijzersteen aan de andere kant van de zwerfsteen te dun is, biedt deze niet de stevigheid die nodig is voor de onderkant van uw steen.

5. Wrijf de ijzersteen weg
Nu u weet welke kant de opaal op moet, gebruikt u de 220 en 280 korrelschijf. U mag de opaal niet aanraken als u eenmaal voor de 220 korrelschijf hebt gekozen, omdat deze snel veel van het glinsterende materiaal kan verwijderen.
Het is ook raadzaam om lichte druk uit te oefenen, variërend van korrel 220, naarmate u dichter bij de opaal komt. U moet doorgaan met het verwijderen van ijzersteen totdat u bijna opaal op een deel van het oppervlak ziet. Soms, voordat u de opaal bereikt, zult u zelfs merken dat de kleur van de ijzersteen verandert.
6. Wrijf naar beneden om de opaal bloot te leggen
Schakel over op de 600-korrelschijf om wat opaal bloot te leggen. In deze fase probeert u niet al het ijzersteen van het oppervlak te verwijderen. U kunt dit doen door heen en weer te gaan tussen de 600-korrelschijf en middelmatige druk uit te oefenen. Oefen lichte druk uit op de 280-korrelschijf. Zodra u weet hoe de laag opaal zich gedraagt, kunt u stoppen met werken aan de bovenkant.

Het snijden en polijsten van opaal:
Polijstschijven beginnen bij diamantkorrel 120 en vervolgens bij rubberschijven met korrel 400 / korrel 600 / korrel 1400 voordat er definitief wordt gepolijst.
1. Dop The Opal
Eerst moeten we de steen op een dopstick plaatsen. Met de steen op de dopstick is hij gemakkelijker te hanteren en te vormen. Gebruik de 220-korrelschijf om de achterkant glad te maken. De twee meest voorkomende manieren om een opaal te dopen zijn met lijm of met was.

2. Lijm
De basis van de steen moet schoon en droog zijn. Breng een of twee druppels lijm aan op de dop-staafjes. Verwarm de opaal voor door hem maximaal 30 seconden op de rand van het dop-potje te leggen.
Duw de opaal met lichte druk in de dopstick. De lijm droogt na ongeveer 30 minuten. 
3. Was
Als de achterkant van de opaal sponsachtig is en de lijm niet werkt, kunt u als alternatief was gebruiken. Verwarm de opaal en druppel gesmolten was op de opaal voordat u de dop-sticks aanbrengt. Zorg ervoor dat de dop-sticks voldoende gesmolten was bevatten.

2. Installeer uw bewateringssysteem
Dit is de stap waarin je de opaal kunt snijden. Als je een apparaat gebruikt dat het water recirculeert, zoals het water dat op de wielen wordt gespoten, kun je het in een pan laten druppelen, het vervolgens uit die pan persen en het opnieuw op de wielen sproeien. Ververs het water en maak de pannen regelmatig vrij van vuil.

3. Pre-Form - Neem de beslissingen
Op dit punt moet u een aantal belangrijke beslissingen nemen. Kijk naar het algemene uiterlijk van uw steen, zowel de ijzererts als de opaal. Hun combinatie kan relatief mooi zijn.
Blijf ijzersteen verwijderen met de 600-korrelschijf. Houd de steen in beweging. De 600-korrelschijf kan opaal nog steeds verwijderen en gladde plekken en krassen veroorzaken. Je kunt veel doen tijdens deze slijpfase. Je verwijdert krassen uit eerdere fasen.
Verwijder vervolgens de ijzersteen van het oppervlak en zorg ervoor dat het oppervlak en de vorm van de steen er aantrekkelijk uitzien. Controleer je steen en observeer wat hij laat zien. Mogelijk moet je terug naar de 280-korrelschijf en de vorm aanpassen. Zodra je de grote krassen hebt verwijderd en tevreden bent met het uiterlijk, ga je over op de 1200-korrelschijf.

4. Finaliseer de vorm en leg de opaal bloot
In deze stap verwijdert de 1200-korrelschijf bijna alle zichtbare krassen. Het zal de vorm van de steen niet veel veranderen, maar het kan de vorm wel verbeteren. Oefen een redelijke druk uit en zorg ervoor dat de steen constant beweegt.
Stop regelmatig en maak de steen schoon om de voortgang te controleren en te controleren of de krassen volledig verdwijnen.
Zodra je de zichtbare krassen hebt verwijderd, schakel je over op een slijpsteen met korrel 3000, of, als je geen slijpsteen met korrel 3000 gebruikt, begin je met het reinigen van je steen. Als je apparaat een slijpsteen met korrel 14.000 heeft, is het raadzaam om geen opaal te slijpen. Deze slijpsteen begint vaak met krassen.
5. Laatste polijstbeurt
De volgende fase is het polijsten. Om het te laten glanzen, kunt u tinoxide gebruiken om de met schuimrubber beklede, ruwe leren pad schoon te maken. Bevochtig het lichtjes met water met behulp van een plantenspuit en laat het apparaat draaien en de pad ronddraaien.
Breng ook met een kwast een goed geroerde mix van water en tinoxide aan op het vochtige doekje. Zowel het watermengsel als het tinoxide moeten dun genoeg zijn om te voorkomen dat het klontert en de uniformiteit van een dunne saus heeft.

Blijf de opalen roeren door de dopstick tussen je vingers te draaien en de positie van het kussentje te variëren. Laat de opaal niet te heet worden. Soms kan het grove leren kussentje de steen vastpakken en uit je handen trekken. Dit komt meestal doordat het kussentje is uitgedroogd of als de steen een ruw oppervlak of zelfs puntige randen heeft.

6. Een opmerking over Matrix Boulder opaal
Als u besluit een matrixopaal te polijsten, kunt u hetzelfde proces volgen. De opaal polijst meestal, maar de matrix van ijzersteen zal droog zijn. Een handige methode is om de opaal schoon te maken zoals uitgelegd en de pad vervolgens licht te laten drogen. Gebruik meer kracht terwijl u de steen in beweging houdt, zodat u voelt dat de steen gelijkmatig warm wordt.
Onthoud dat u de matrix reinigt, niet de opaalvlekken van uw steen. Wees voorzichtig bij het verwarmen van de steen langs uw polijstpad, dit kan de afwerking van de matrix aantasten. Houd er echter rekening mee dat te veel hitte de opaal kan beschadigen. Deze methode vereist wat oefening, maar het resultaat kan de moeite waard zijn.
7. Maak de achterkant van de steen af
Tot slot kunt u de achterkant afwerken. Wanneer u klaar bent met polijsten, haalt u de steen van de dopstick. U kunt lichte tot normale druk uitoefenen op uw slijpsteen met een korrelgrootte van ongeveer 220-280 om eventuele resten van de doping te verwijderen.
Houd de steen plat tegen de schijf, maar draai hem lichtjes om krassen op de achterkant te voorkomen. Kies nu de gewenste maat voor de steen. Wanneer u de juiste dikte hebt gevonden, brengt u korrel 220 of 280 aan op de schijf. Dit kan helpen om afbrokkeling tijdens het zetten te minimaliseren.
Je kunt de opaal als voltooid beschouwen, of een meer afgewerkte look creëren door de achterkant door de resterende ketting van fijnere schijven te halen. Je moet het achterste deel van de stenen slijpen met schijven met korrel 1200 of 3000.
8. Het eindproduct
Nadat alle opalen zijn geslepen en gepolijst, kunnen ze worden gesorteerd en geclassificeerd.
Boulderopalen zijn prachtige hangers. Je hebt alleen een boormachine nodig om een gat in de punt te maken. Rijg ze door een leren bandje en je hebt een prachtige ketting met boulderopalen.

Een handige tip van een opaalsnijder
Maak je je zorgen over het aan- en uitzetten van je apparaat met natte handen? Probeer eens een dopperstick op de schakelaar van het stopcontact te lijmen. Zo komt er nooit iets nats in contact met elektriciteit. Geweldig!

Winkel voor Boulder Rough

Zoek de Opal Encyclopedia
Gerelateerde veilingen


gerelateerde artikelen
Boulder Opaal is een van de meest ondergewaardeerde opalen op de markt. Leer meer over deze unieke opaal en bekijk de prachtige stenen die we te koop aanbieden.
29th May 2019
Er zijn zoveel Queensland Opaalmijnen verspreid over 1000 km². Klik om meer te weten te komen over elke locatie en bekijk onze prachtige Queensland Opalen te koop.
5th Mar 2019
De truc om een zo effectief mogelijke portefeuille samen te stellen, is door een gediversifieerde portefeuille te hebben. Dit is precies de reden waarom sommige topfinanciële adviseurs aanraden om items zoals opaal aan portefeuilles toe te voegen.
14th Jul 2019
Laatste artikels
Zwarte opalen zijn de meest gewilde opaalsoort, met een diepe basis die een regenboog aan reflecties creëert. Ontdek de toepassingen, eigenschappen, geschiedenis en waarde van zwarte opalen!
7th Dec 2025
Ontdek hoe opalen worden beoordeeld en welke factoren hun prijs beïnvloeden. Van kleur en helderheid tot slijpvorm en herkomst, leer hoe elk type opaal wordt gewaardeerd - met voorbeelden van prijsklassen.
19th Jul 2023
Ga mee op reis en leer over de helende kracht van opalen van onze gastschrijver Vivien Schapera van Crystal Healing Techniques!
20th May 2023
Artikelcategorieën
All there is to know about Opals including Black Opals, Ethiopian Opals & Boulder Opal
14 Artikelen
Check out our fascinating information and articles on all things amazing in the Opal world
41 Artikelen
Opal Auctions sellers who are approved as opal Verified Sellers
4 Artikelen