
ボルダーオパールのカットと研磨方法
 このガイドでは、オーストラリア産ボルダーオパールをカットするための秘訣をいくつかご紹介します。ボルダーオパールは、硬い鉄鉱石の裏に貴石オパールが埋め込まれたオパールです。貴石オパールは鉄鉱石の上に薄く層状に重なっている場合もあれば、鉄鉱石の中に絡み合っている場合もあります。
オーストラリア産のクイーンズランド産ボルダーオパールは、魅力的な石です。ボルダーオパールのカットは難しい作業ですが、非常に硬い素材のためカットミスが起きにくく、その結果は息を呑むほど美しいものになります。そのため、初心者だけでなく経験豊富なカット職人にも最適です。
ボルダーオパールのカットと研磨の基本的な方法の概要を見ていきましょう。

必要な装備:
- ドップスティック
- ドップワックスまたは強力な接着剤
- 薄いトリムソー
- ブレード(リムの厚さ約0.02インチ)
- ダイヤモンド研削ホイール 80、220、600、1200、3000 グリット
- 切断装置
- 粗い革
- 研磨ディスク
- 酸化スズ研磨剤
- 100ワットの電球付きランプ
- 安全メガネ
- 防塵マスク
- 古い作業服
- 給水


原材の準備:
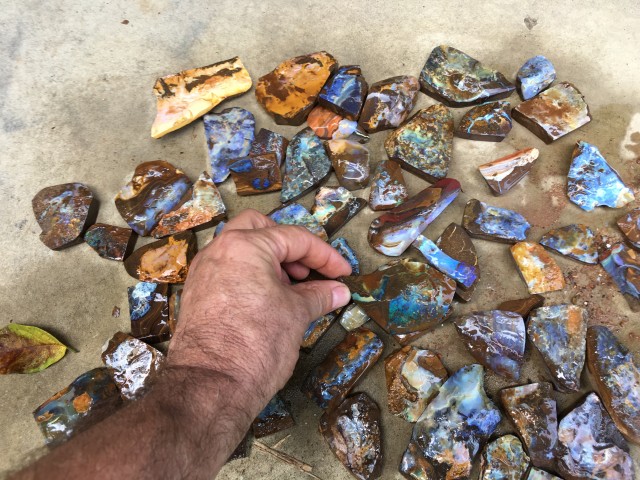
1. オパールを自分で選ぶ
研磨したいオパールの作業日を選びましょう。複数の石を同時にカットすると、機械のセットアップが一度で済むため、より効率的です。加工するボルダーオパールを選ぶことは、それ自体が技術を要します。他の原石の加工と同様に、知識が豊富であればあるほど良い結果が得られます。オパールの周りの鉄鉱石が十分に強度があり、ひび割れがないことを確認してください。最初は比較的低品質の石でも良いでしょう。美しい石が出来上がるとは限りませんが、体系的な技術を磨けば、魅力的な石を思い通りにカットできるようになります。


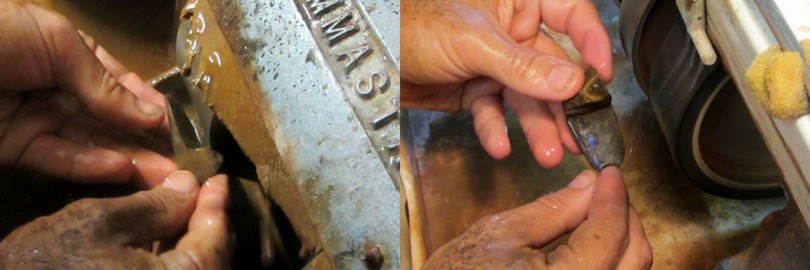
2. オパールを研究し、鋸で切る
鉄鉱石の模様から、鉱脈の通り道となる経路の手がかりを得ましょう。鉄鉱石にオパールが含まれている場合、母岩に沿って平らでまっすぐな平行線が見られます。オパールはこの線に沿って進む可能性が高くなります。原石を水に浸した場合は、まず乾燥させてオパールの通り道を確認しましょう。石全体に亀裂が走っていないか確認し、欠陥がないか再度確認してください。石全体に亀裂が走っている場合は、鋸を使って亀裂に沿ってオパールを割ることができます。こうすることで、後々の問題を回避できます。
購入する原石のほとんどは既にスラブ化されているため、オパール層をはっきりと見ることができます。もし原石が完全に粗く、オパール層が見えにくい場合は、石を鋸で切ってオパール層を露出させる必要があります。
鋸刃は常に水に浸けておいてください。十分な水を使って、ほこりを抑え、オパールを冷やしてください。オパールはすぐに熱くなり割れてしまうので、絶対に乾いた状態で切らないでください。

3. 粗い切削ホイールを使用して材料を除去する
いよいよ楽しい時間です。汚れるので、古着を用意してください。縫い目の方向がだいたい分かったので、いよいよこすり落とします。80番と220番のホイールを併用すると、オパールのこすり落としがずっと楽になります。粗いホイールを使うと、素早く汚れを落とします。オパールの線に近づきすぎないように注意してください。オパールの層は予測できないことがあるので、層のすぐ上をこすり落とすようにしてください。
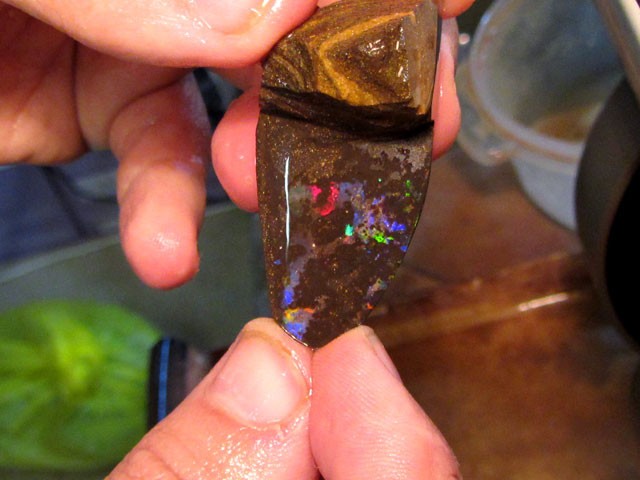
4. オパールについて学び、理解を深める
さあ、オパールをよく見てみましょう。どの面を一番上にするか決めなければなりません。オパールの形や層、色、明るさ、そして周囲の素材の幅などを参考に判断しましょう。
オパールの真下の素材は、できるだけ暗い色を選ぶようにしてください。この暗い色合いにより、オパールの色が際立ちます。オパールの列と鉄鉱石の間に薄い黒い斑点があると、石が際立ちます。この黒い斑点が石の背景となるように、石をカットするようにしてください。
この種の石はブラックボルダーと呼ばれ、非常に輝きを放ちます。ボルダーオパールは、しっかりとした基盤でできていることも重要です。オパールの反対側の面にある鉄鉱石が薄すぎると、石の底部に必要な強度が得られません。

5. 鉄石をこすり落とす
オパールの向きが決まったら、220番と280番の研磨ホイールを使います。220番の研磨ホイールを使う場合は、オパールに接触してはいけません。220番の研磨ホイールを使うと、鮮やかな色の材料がかなり早く削り取られてしまうからです。
オパールに近づくにつれて、220番の砥石で軽く研磨することをお勧めします。表面の一部にオパールが現れる直前まで、鉄鉱石を除去し続けなければなりません。オパールに到達する前に、鉄鉱石の色が変化していることに気付くこともあります。
6. オパールを露出させるために磨く
オパールを少し露出させるために、600番のホイールに切り替えます。この時点では、表面の鉄鉱石をすべて除去しようとするわけではありません。600番のホイールを中程度の圧力で往復させることで、鉄鉱石を完全に除去できます。280番のホイールは軽い圧力で研磨します。オパール層の動きを確認したら、表面の作業は終了です。

オパールのカットと研磨:
研磨ホイールは、最終研磨の前に 120 グリットのダイヤモンドから始まり、その後ゴム製ホイールで 400 グリット / 600 グリット / 1400 グリットを使用します。
1. ドップ・ザ・オパール
まず、石をドップスティックに取り付けます。ドップスティックに石を取り付けておくと、操作や形作りがしやすくなります。220番のホイールを使って、裏側のトーンを平らにします。オパールのドップには、接着剤とワックスの2つの方法が一般的です。

2. 接着剤
石の底面はきれいに洗浄し、乾燥させておきます。ドップスティックに接着剤を1~2滴垂らします。オパールをドップポットの縁に30秒ほど置いて予熱します。
軽く力を入れてオパールをドップスティックに押し込みます。接着剤は約30分で乾きます。 
3. ワックス
オパールの裏側がスポンジ状で接着剤がうまく機能しない場合は、ワックスを代わりに使用できます。オパールを温め、溶かしたワックスをオパールの上に垂らしてから、ドップスティックに貼り付けます。ドップスティックには、十分な量の溶けたワックスが付いていることを確認してください。

2. 散水システムを設定する
この段階でオパールをカットできます。水を再循環させる装置(例えば、ホイールに噴射する水など)をお使いの場合は、水を容器に滴下し、容器から押し出して再びホイールに噴射します。定期的に水を交換して、容器の汚れを落としてください。

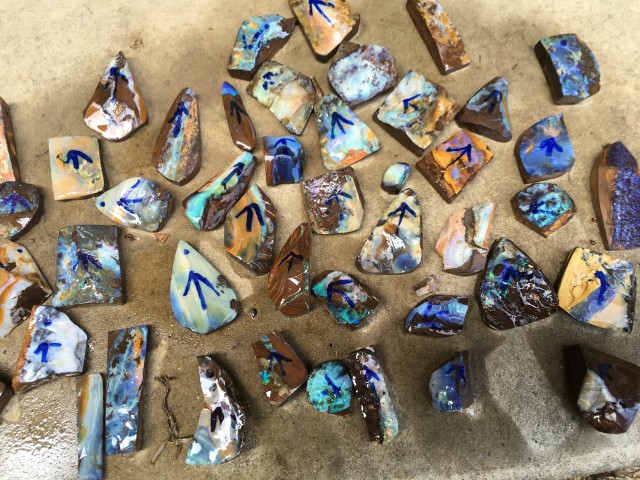
3. 事前フォーム - 決定を下す
この時点で、いくつか重要な決断を下す必要があります。アイアンストーンとオパール、両方の石の全体的な外観を見てください。この組み合わせは比較的美しいものになるかもしれません。
600番のホイールで鉄鉱石を除去し続けます。砥石を動かし続けることを意識してください。600番のホイールは、オパールを削り、滑らかな斑点や削り跡を作ることができます。この段階では、様々な作業が可能です。前の段階で生じた傷を除去しているのです。
次に、表面から鉄鉱石を取り除き、石の表面と形状を整えます。見た目も美しく仕上がります。石の状態を確認し、どのような仕上がりになるか観察してください。280番のホイールに戻して形状を変える必要があるかもしれません。大きな傷を取り除き、見た目に満足したら、1200番のホイールに切り替えましょう。

4. 形を仕上げてオパールを露出させる
このステップでは、1200番の砥石で目立った傷をほぼすべて除去します。石の形を大きく変えることはできませんが、より美しい形に仕上げることができます。適度な圧力をかけ、石が常に動いていることを確認してください。
定期的に作業を止めて石を掃除し、進捗状況を確認し、傷が完全に消えていることを確認してください。
目立つ傷を取り除いたら、3000番のホイールに切り替えます。3000番のホイールを使用していない場合は、石の洗浄を始めます。お使いの研磨機が14,000番のホイールで構成されている場合は、ボルダーオパールのカットは避けた方が良いでしょう。このホイールは、傷がつきやすいからです。
5. 最終仕上げ
次の段階は研磨です。光沢を出すために、フォーム裏地の粗いレザーパッドを酸化スズで洗浄できます。スプレーボトルを使って軽く水に浸し、ランニングマシンでパッドを回転させながら磨いてください。
また、ブラシを使って、水と酸化スズをよく混ぜたものを湿らせたパッドに塗ります。この時、水と酸化スズを混ぜた液は、固まらない程度に薄く、薄いグレービーソースのように均一に塗る必要があります。

指の間でドップスティックを回したり、パッドの位置を変えたりして、オパールをかき混ぜ続けます。オパールが熱くなりすぎないように注意してください。粗い革パッドが石をひっかけて手から引き抜いてしまうことがあります。これは通常、パッドが乾燥しているか、石の表面が粗い、あるいは尖ったエッジがある場合に発生します。

6. マトリックスボルダーオパールについて
マトリックスオパールを研磨する場合も、同じ手順で研磨できます。オパールは通常研磨できますが、鉄鉱石のマトリックスは乾燥しています。効果的な方法は、説明したようにオパールを洗浄し、パッドを軽く乾かすことです。石を動かしながら、より強い力で研磨することで、石がさらに温かくなるのを感じることができます。
石のオパール部分ではなく、母岩部分をクリーニングしていることを忘れないでください。研磨パッドに沿って石を加熱する際は、母岩の表面が滑らかになる可能性があるため、ご注意ください。ただし、加熱しすぎるとオパールが割れる可能性があるため、ご注意ください。この方法は少し練習が必要ですが、その効果は十分に期待できます。
7. 石の裏側を仕上げる
最後に、裏面の仕上げを行います。研磨が終わったら、砥石をドップスティックから取り出します。研磨ホイールに軽く、または標準の圧力で、約220~280番の圧力をかけ、残留物を取り除きます。
砥石はホイールに対して平らに当てますが、裏面に傷がつかないように少し回してください。この時点で、砥石のサイズに合わせて研磨剤を選びます。適切な厚さになったら、砥石に220番または280番の研磨剤を塗布すると、セッティング時の欠けを最小限に抑えることができます。
オパールはこれで完成と考えてもいいですし、残りの細かいホイールに裏側を通すことで、より完成度の高い仕上がりにすることもできます。石の裏側は、1200番または3000番のホイールでカットする必要があります。
8. 完成品
すべてのオパールがカットされ、研磨された後、分類され、等級分けされます。
ボルダーオパールはペンダントとして最適です。先端にドリルで穴を開けるだけで、美しいボルダーオパールのネックレスが完成します。革のストラップに通せば、素敵なボルダーオパールネックレスが完成します。

オパールカッターからの便利なヒント
濡れた手でマシンの電源をオンオフするのが心配ですか?電源ボードのスイッチにドップスティックを接着してみてください。そうすれば、濡れたものが電気に触れることはありません。素晴らしいですね。

ボルダーラフのショップ

Opal Encyclopedia検索
最新記事
ブラックオパールは、オパールの中でも最も人気のある種類です。深いベースが表面に虹色の輝きを放ちます。ブラックオパールの用途、特性、歴史、そして価値についてご紹介します。
7th Dec 2025
オパールの等級付け方法と価格に影響を与える要因をご紹介します。色や輝き、カットや産地など、それぞれのオパールの価値がどのように評価されるのか、価格帯の例とともにご紹介します。
19th Jul 2023
記事のカテゴリ
All there is to know about Opals including Black Opals, Ethiopian Opals & Boulder Opal
14記事数
Check out our fascinating information and articles on all things amazing in the Opal world
41記事数