
Cómo cortar y pulir ópalo de roca
 En esta guía te mostraremos algunos de los mejores trucos para tallar ópalo de roca australiano. El ópalo de roca es un ópalo con una base dura de hierro que contiene ópalo precioso. El ópalo precioso puede formar una fina capa sobre el hierro o estar entretejido en él.
El ópalo de roca australiano de Queensland es una piedra fascinante. Tallar ópalos de roca es un reto, pero los resultados suelen ser impresionantes, ya que la dureza del material dificulta cometer errores de corte. Por ello, este tipo de material es adecuado tanto para principiantes como para talladores experimentados.
Vamos a adentrarnos en una descripción general básica sobre cómo cortar y pulir el ópalo de roca.

Equipo que necesitará:
- varillas de dop
- Cera para dop o pegamento fuerte
- Sierra de recorte con mango delgado
- Hoja (con un grosor de borde de aproximadamente 0,02”)
- Muelas de diamante de grano 80, 220, 600, 1200 y 3000
- Equipo de corte
- cuero áspero
- Disco de pulido
- Pulimento de óxido de estaño
- Lámpara con bombilla de 100 vatios
- gafas de seguridad
- mascarilla antipolvo
- ropa de trabajo vieja
- Suministro de agua


Preparación de la materia prima:
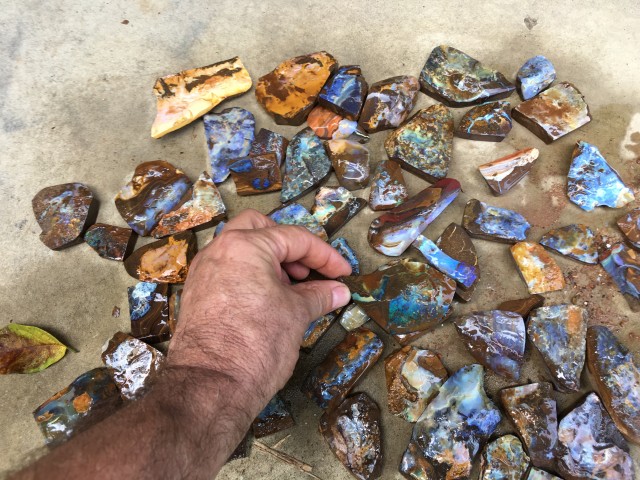
1. Selecciona tus ópalos a mano
Selecciona los ópalos que quieras pulir. Es más eficiente cortar varias piedras a la vez, ya que solo tendrás que preparar la máquina una vez. Seleccionar el ópalo de roca adecuado es todo un arte. Como con cualquier otro material en bruto, cuanto más sepas, mejor. Asegúrate de que la piedra de hierro que rodea el ópalo sea bastante resistente y esté libre de grietas. Un material de calidad relativamente baja es un buen punto de partida. Puede que no consigas una piedra preciosa, pero desarrollarás la suficiente habilidad sistemática como para poder tallar esa piedra atractiva a tu gusto.


2. Estudia el ópalo y córtalo.
Observa el patrón de la piedra de hierro para obtener pistas sobre la dirección de la veta. Cuando el ópalo se encuentra en la piedra de hierro, presenta líneas paralelas planas y rectas a lo largo de la matriz. Hay mayor probabilidad de que el ópalo siga esta línea. Si la piedra en bruto está remojada en agua, déjala secar primero para poder ver la dirección del ópalo. Busca grietas transversales y cualquier otra imperfección en la piedra. Si encuentras grietas, puedes usar la sierra para partir el ópalo a lo largo de la grieta. Esto evitará problemas posteriores.
La mayor parte del material en bruto que comprará ya viene laminado, por lo que podrá ver claramente la capa de ópalo. Si el material es completamente rugoso y no puede ver fácilmente el ópalo, deberá serrar la piedra para exponer la capa de ópalo.
La hoja de sierra siempre debe estar sumergida en agua. Use abundante agua para evitar que se levante polvo y para mantener el ópalo fresco. Nunca corte en seco, ya que el ópalo se calienta rápidamente y se agrieta.

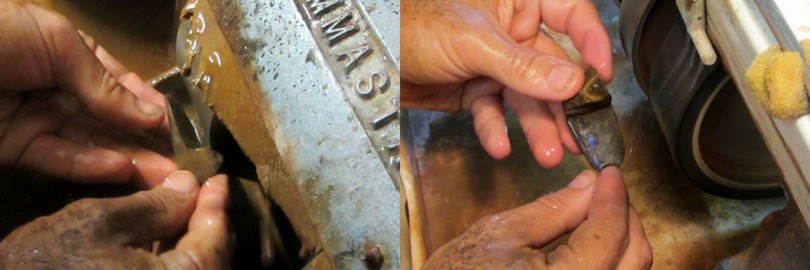
3. Utilice un disco de corte grueso para eliminar el material.
Ahora viene lo divertido. Necesitarás ropa vieja porque se va a ensuciar. Ahora que tienes una idea aproximada de la dirección de la veta, es hora de lijarla. Usar una combinación de discos de grano 80 y 220 facilita mucho el lijado del ópalo. Usa el disco de grano grueso para eliminar material rápidamente. Intenta no acercarte demasiado a la veta del ópalo. La capa de ópalo puede ser impredecible, así que procura mantenerte justo por encima de ella.
4. Estudia y familiarízate con el ópalo.
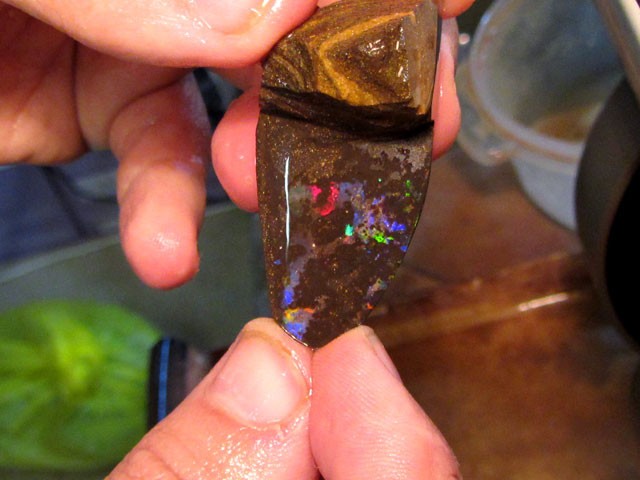
Ahora es el momento de familiarizarse con el ópalo. Debe decidir qué superficie será la superior. Base su juicio en la forma y las capas del ópalo, el color, el brillo y el grosor del material circundante.
Asegúrate de que el material justo debajo del ópalo sea lo más oscuro posible. Este fondo oscuro hará que los colores del ópalo resalten. Si hay una fina capa de potch oscuro entre la hilera de ópalos y la piedra de hierro, la piedra resaltará aún más. Debes intentar cortar la piedra de manera que esta capa negra sirva de fondo para el ópalo.
Este tipo de piedra se conoce como ópalo negro y puede ser muy brillante. Es importante que el ópalo tenga una base sólida. Si la capa de hierro en la superficie del ópalo es demasiado delgada, no tendrá la resistencia necesaria en la base.

5. Frota para eliminar la piedra de hierro
Ahora que ya sabes hacia dónde apunta el ópalo, usa las muelas de grano 220 y 280. No debes tocar el ópalo una vez que uses la muela de grano 220, ya que puede eliminar rápidamente gran parte de su brillo.
También es recomendable aplicar una presión ligera con una muela de grano 220 a medida que se acerca al ópalo. Debe seguir eliminando la piedra de hierro hasta que esté a punto de revelar el ópalo en una parte de la superficie. En ocasiones, antes de llegar al ópalo, incluso notará que el color de la piedra de hierro cambia.
6. Frota para exponer el ópalo
Cambia a la muela de grano 600 para exponer parte del ópalo. En esta etapa, no es necesario eliminar por completo la piedra de hierro de la superficie. Puedes hacerlo alternando entre la muela de grano 600 con presión media y la de grano 280 con presión ligera. Una vez que comprendas cómo se comporta la capa de ópalo, puedes dejar de trabajar en la superficie.

Corte y pulido del ópalo:
Las ruedas de pulido comienzan con diamante de grano 120, luego ruedas de goma de grano 400 / 600 / 1400 antes del pulido final.
1. Dop The Opal
Primero, debemos colocar la piedra sobre una varilla de encolado. Una vez colocada, es más fácil manipularla y darle forma. Utilice la rueda de grano 220 para alisar el tono de su reverso. Las dos formas más comunes de encolar un ópalo son con pegamento o con cera.

2. Pegamento
La base de la piedra debe estar limpia y seca. Aplique una o dos gotas de pegamento a los palitos de pegamento. Precaliente el ópalo colocándolo sobre el borde del recipiente para pegamento durante no más de 30 segundos.
Aplique una ligera presión para insertar el ópalo en la varilla adhesiva. El pegamento se secará en unos 30 minutos. 
3. Cera
Si el reverso del ópalo es esponjoso y el pegamento no funciona, puede usar cera como alternativa. Caliente el ópalo y vierta cera derretida sobre él antes de aplicarlo a las varillas adhesivas. Asegúrese de que las varillas tengan suficiente cera derretida.

2. Instala tu sistema de riego
En este paso se puede cortar el ópalo. Si se utiliza un dispositivo que recircula el agua, como el agua que se rocía sobre las ruedas, se puede recoger el agua que gotea en una bandeja, forzarla desde allí y rociarla de nuevo sobre las ruedas. Es importante cambiar el agua y limpiar las bandejas con regularidad.

3. Pre-formulario - Toma las decisiones
En este punto, debes tomar algunas decisiones importantes. Observa el aspecto general de la piedra, tanto la de hierro como la de ópalo. Su combinación puede resultar muy bella.
Continúa eliminando la piedra de hierro con la muela de grano 600. Recuerda mantener la piedra en movimiento. La muela de grano 600 aún puede reducir el ópalo y crear zonas lisas y raspaduras. Puedes hacer muchas cosas durante esta etapa del corte. Estás eliminando los arañazos de las etapas anteriores.
Luego, elimina la piedra de hierro de la superficie y consigue que la forma y el acabado de la piedra sean agradables a la vista. Examina la piedra y observa su estado. Puede que necesites volver a usar la muela de grano 280 y modificar su forma. Una vez que hayas eliminado los arañazos profundos y estés satisfecho con el resultado, pasa a la muela de grano 1200.

4. Finalizar la forma y exponer el ópalo
En este paso, la muela de grano 1200 eliminará casi todos los arañazos visibles. No modificará mucho la forma de la piedra, pero sí la mejorará. Aplique una presión moderada y asegúrese de que la piedra esté en constante movimiento.
Deténgase regularmente y limpie la piedra para verificar el progreso y asegurarse de que los arañazos estén desapareciendo por completo.
Una vez eliminados los arañazos visibles, cambia a la rueda de grano 3000. Si no usas una rueda de grano 3000, comienza a limpiar la piedra. Si tu herramienta tiene una rueda de grano 14 000, no es recomendable cortar ópalo de roca, ya que esta rueda suele rayarse con facilidad.
5. Pulido final
La siguiente fase es el pulido. Para darle brillo, puedes usar óxido de estaño para limpiar la almohadilla de cuero rugoso con respaldo de espuma. Simplemente humedécela ligeramente con agua usando un pulverizador y haz girar la almohadilla con la pulidora.
Además, con un pincel, aplique una mezcla bien batida de agua y óxido de estaño sobre la almohadilla húmeda. La mezcla, tanto de agua como de óxido de estaño, debe tener una consistencia lo suficientemente fluida para que no se formen grumos, similar a la de una salsa ligera.

Simplemente remueve los ópalos girando la varilla entre los dedos y variando la posición de la almohadilla. No dejes que el ópalo se caliente demasiado. A veces, la almohadilla de cuero áspera puede enganchar la piedra y hacer que se te escape de las manos. Esto suele ocurrir porque la almohadilla se ha secado o si la piedra tiene una superficie rugosa o incluso bordes puntiagudos.

6. Una nota sobre el ópalo Matrix Boulder
Si decides pulir un ópalo matriz, puedes seguir el mismo proceso. El ópalo suele pulirse, pero la matriz de hierro estará seca. Un método útil consiste en limpiar el ópalo como se explicó y luego dejar que la almohadilla se seque ligeramente. Aplica más presión mientras mantienes la piedra en movimiento, de modo que notes que se calienta de manera uniforme.
Recuerda que estás limpiando la matriz, no las manchas de ópalo de tu piedra. Ten cuidado al calentar la piedra con la almohadilla de pulido, ya que esto puede realzar el acabado de la matriz, pero ten presente que demasiado calor puede dañar el ópalo. Este método requiere algo de práctica, pero los resultados pueden valer la pena.
7. Termina la parte posterior de la piedra
Por último, puedes dar el acabado final a la parte posterior. Una vez terminado el pulido, retira la piedra de su soporte. Aplica una presión ligera o media, aproximadamente de 220 a 280, con una muela de grano fino para eliminar cualquier residuo del producto de pulido.
Debes mantener la piedra plana contra la rueda, pero girándola ligeramente para evitar rayaduras en la parte posterior. A continuación, selecciona el tamaño adecuado para la piedra. Una vez que hayas elegido el grosor correcto, aplica una lija de grano 220 o 280 a la rueda para minimizar el astillado durante el ajuste.
Puedes dar por terminado el ópalo o conseguir un acabado más pulido pasando la parte posterior por la cadena restante de muelas más finas. Debes pulir la parte posterior de las piedras con muelas de grano 1200 o 3000.
8. El producto final
Una vez que todos los ópalos hayan sido cortados y pulidos, se pueden clasificar y graduar.
Los ópalos de roca son ideales para hacer colgantes. Solo necesitas un taladro para perforar la punta. Pasa una correa de cuero y ¡listo! Ya tienes un precioso collar de ópalo de roca.

Un consejo práctico de un tallador de ópalos.
¿Te preocupa encender y apagar la máquina con las manos mojadas? Prueba a pegar una barra de papel absorbente al interruptor de la placa de alimentación. Así, nada mojado entrará en contacto con la electricidad. ¡Genial!

Compra Boulder Rough

Buscar en el Opal Encyclopedia
Subastas relacionadas


Artículos relacionados
El ópalo de roca es uno de los ópalos más valiosos y subestimados del mercado. Descubra más sobre este ópalo único y explore las hermosas piedras que tenemos a la venta.
29th May 2019
Todos los poemas de esta página pertenecen a sus respectivos autores. Se prohíbe su reproducción no autorizada.
9th May 2018
últimos artículos
Los ópalos negros son la variedad más codiciada, con bases profundas que crean un arcoíris de reflejos en la parte superior. ¡Descubre los usos, las propiedades, la historia y el valor de los ópalos negros!
7th Dec 2025
Descubra cómo se clasifican los ópalos y qué factores influyen en su precio. Desde el color y el brillo hasta la talla y el origen, aprenda cómo se valora cada tipo de ópalo, con ejemplos de rangos de precios.
19th Jul 2023
¡Acompáñanos en un viaje y descubre el poder curativo de los ópalos de la mano de nuestra escritora invitada Vivien Schapera, de Crystal Healing Techniques!
20th May 2023
Categorías de artículos
All there is to know about Opals including Black Opals, Ethiopian Opals & Boulder Opal
14 Artículos
Check out our fascinating information and articles on all things amazing in the Opal world
41 Artículos
Opal Auctions sellers who are approved as opal Verified Sellers
4 Artículos