
Sɛnea Wotwitwa Na Woyɛ Polish Boulder Opal
 Wɔ akwankyerɛ yi mu no yɛbɛkyerɛ wo akwan a ɛkorɔn bi a wɔfa so twa Australia Boulder Opal. Boulder opal yɛ opal a ɛwɔ akyi a ɛyɛ den a wɔde Ironstone a opal a ɛsom bo ka ho. Opal a ɛsom bo no betumi ayɛ ade a ɛyɛ tratraa wɔ Ironstone no atifi anaasɛ ebetumi abɔ mu wɔ Ironstone no mu.
Australia abotan so opal a efi Queensland yɛ ɔbo a ɛyɛ anigye. Boulder opals a wobɛtwa no yɛ asɛnnennen nanso nea efi mu ba no taa yɛ nea ɛyɛ nwonwa efisɛ ade no yɛ den araa ma ɛyɛ den sɛ wobɛyɛ mfomso wɔ twa mu enti saa ade yi ye ma novice cutters ne afei nso wɔn a wɔn ho akokwaw wɔ cutters.
Momma yɛnkɔhyɛ mfitiaseɛ nsusuiɛ mu wɔ sɛdeɛ wɔtwa na wɔpopa boulder opal.

Nnwinnade a Wobɛhia:
- Dop nnua a wɔde yɛ
- Fa wax anaa gluu a ano yɛ den gu mu
- Trim saw ne thin
- Blade (a ne rim kɛse bɛyɛ 0.02”) .
- Diamond a wɔde twitwiw ntwahonan a ɛyɛ 80, 220, 600, 1200, ne 3000 grits
- Nnwinnade a wɔde twa nneɛma
- Nwoma a ɛyɛ den
- Disk a wɔde yɛ polishing
- Tin oxide a wɔde yɛ aduru
- Kanea a ɛwɔ bɔlɔb a ɛyɛ watt 100
- Ahobammɔ ahwehwɛ
- Mfutuma akataso
- Adwuma ntade dedaw
- Nsuo a wɔde ma


Ahosiesie a Wɔde Yɛ Nneɛma a Ɛyɛ Den no:
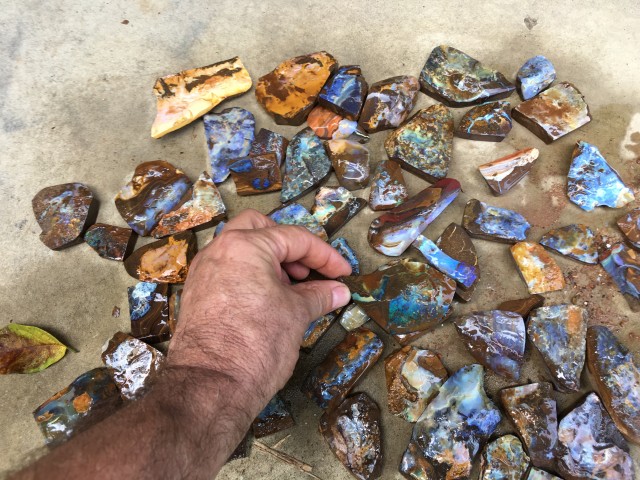
1. Nsa Paw Wo Opals
Paw nna adwuma a opals a wopɛ sɛ wo polish. Ɛyɛ efficientto twitwa abo pii atthe bere koro mu sɛ wubehia sɛ toset-upthe afiri pɛnkoro pɛ. Boulder opal a wobɛpaw sɛ wode bɛyɛ adwuma no ankasa yɛ ahokokwaw. Te sɛ nea wode nneɛma foforo biara a ɛyɛ den bɛyɛ adwuma dodow a wunim no, dodow no ara na eye. Hwɛ hu sɛ dade bo a atwa opal no ho ahyia no mu yɛ den yiye na mpaapaemu biara nni mu. Nneɛma bi a ɛba fam a ntease wom ye sɛ wubefi ase. Ebia worenkɔwie ɔboɔ fɛfɛ nanso wobɛtumi anya wo nhyehyɛeɛ ho nimdeɛ araa ma wobɛtumi atwitwa saa ɔboɔ a ɛyɛ fɛ no wɔ ɔkwan biara a wopɛ so.


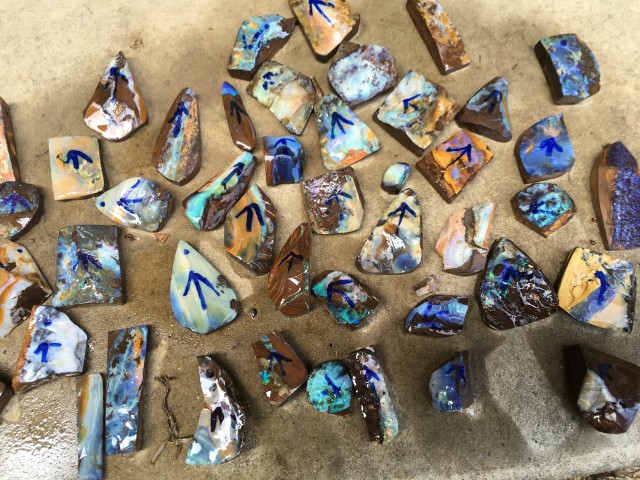
2. Sua Opal Na Wohui
Hwehwɛ dade ɔbo no nsusuwso na ama woanya ɔkwan a nhama no bɛfa so no ho nsɛnkyerɛnne bi. Sɛ Opal pue wɔ dade abo mu a, ɛwɔ nsensanee a ɛyɛ tratraa na ɛyɛ tẽẽ a ɛne ne ho di nsɛ wɔ matrix no so. Hokwan pa wɔ hɔ sɛ opal no bedi saa line yi akyi.Sɛ wɔde rough no ahyɛ nsu mu a ma ɛnwo kan sɛnea ɛbɛyɛ a wubetumi ahu baabi a Opal no retu mmirika. Hwɛ sɛ mpaapaemu atu mmirika wɔ ɔbo no so na san hwehwɛ sintɔ biara wɔ ɔbo no nyinaa mu. Sɛ mpaapaemu bi nam ɔboɔ no mu a wobɛtumi de saw no apaapae opal no mu akɔ fam mpaapaemu no. Eyi bɛma wɔakwati ɔhaw biara akyiri yi.
Wɔabɔ nneɛma a ɛyɛ den a wobɛtɔ no mu dodow no ara dedaw sɛnea ɛbɛyɛ a wubetumi ahu Opal layer no pefee. Sɛ wɔn material iscompletelyrough na wo ntumi nhu Opal no ntɛm a ɛho behia sɛ wo saw ɔbo no na ama Opal layer no ada adi.
Ɛsɛ sɛ saw blade no wɔ nsu ase bere nyinaa. Fa nsu pii di dwuma na ama mfutuma no akɔ fam na Opal no ayɛ nwini. Mma ntwitwa no nwunu da efisɛ opal bɛyɛ hyew ntɛmntɛm na apaapae.

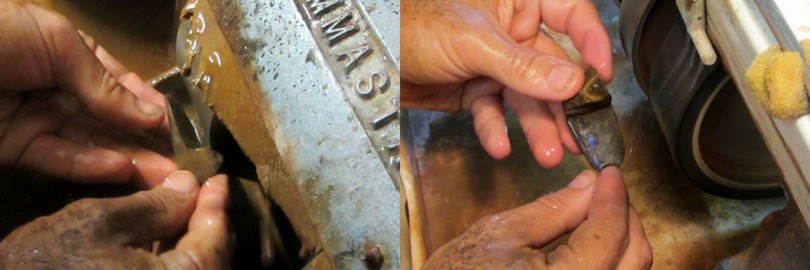
3. Fa Coarse Cutting Wheel Yi Nneɛma Fi Mu
Mprempren ne ɔfã a ɛyɛ anigye no. Wubehia ntade dedaw bi efisɛ ɛbɛgu fĩ. Seesei a woanya adwene a ɛfata wɔ ɔkwan a nhama no bɛfa so no ho no, bere aso sɛ wode petepete so. Sɛ wowɔ 80 ne 220 grit wheel a wɔaka abom a, ebetumi ama Opal no a wɔde petepete fam no ayɛ mmerɛw kɛse. fa coarse grit wheel no yi nneɛma fi hɔ ntɛmntɛm. Bɔ mmɔden sɛ worenbɛn opal nhama no dodo. Opal layer no betumi ayɛ nea wontumi nhyɛ da nkyerɛ enti bɔ mmɔden na tra layer no atifi pɛɛ.
4. Sua Na Hu Opal No Ho Adesua
Afei bere aso sɛ wuhu Opal no yiye. Ɛsɛ sɛ wusi gyinae sɛ ɔfasu bɛn na ɛbɛyɛ nea ɛwɔ soro. Fa w’atemmu gyina sɛnea opal no te ne nea ɛwɔ so, kɔla, hyerɛn, ne nneɛma a atwa ho ahyia no trɛw so.
Bɔ mmɔden sɛ wobɛhwɛ sɛ nneɛma a ɛwɔ Opal no ase tẽẽ no yɛ sum sɛnea wubetumi. Saa nhyehyɛe a ɛyɛ sum yi bɛma opal no kɔla ahorow no ada nsow. Sɛ potch tuntum katasoɔ teateaa bi wɔ Opal row no ne dadeɛ boɔ no ntam a ɛbɛma ɔboɔ no pop. Ɛsɛ sɛ wobɔ mmɔden sɛ wobɛtwitwa ɔbo no sɛnea ɛbɛyɛ a saa ade tuntum a wɔde akata so yi bɛma woanya akyigyina ama wo bo no.
Wɔfrɛ ɔbo a ɛte sɛɛ sɛ ɔbo tuntum na ebetumi ahyerɛn yiye. Ɛho hia nso sɛ ɔbotan opal no yɛ nnyinaso a ɛyɛ den. Sɛ dade bo a ɛwɔ opal no ani foforo no yɛ mmerɛw dodo a, ɛremma ahoɔden a ehia ma wo bo no ase no.

5. Rub Away Dadeɛ Aboɔ no
Seesei a wunim ɔkwan a opal no bɛfa so no fa 220 ne 280 grit wheel no di dwuma. Ɛnsɛ sɛ wo ne opal no di nkitaho bere a woasi gyinae sɛ wode 220-grit wheel no bedi dwuma no efisɛ ebetumi ayi nneɛma a ɛyɛ hyew no kakraa bi afi hɔ ntɛmntɛm.
Ɛyɛ papa nso sɛ wode nhyɛso a emu yɛ hare a efi 220-grit wheel bedi dwuma bere a worebɛn opal no. Ɛsɛ sɛ wokɔ so yi dade abo fi hɔ kosi sɛ wobɛda opal adi wɔ ɔfã biako pɛ. Ɛtɔ mmere bi a, ansa na wubedu opal no ho no, wubehu mpo sɛ dade abo no kɔla bɛsakra.
6. Rub Down Na Ɛbɛda Opal No adi
Dan kɔ 600-grit wheel no so sɛnea ɛbɛyɛ a wobɛda opal bi adi. Saa bere yi de, ɛnyɛ sɛ worebɔ mmɔden sɛ wubeyi dade abo no nyinaa afi soro. Wubetumi ayɛ denam ntwahonan a ɛwɔ 600-grit no ntam a wobɛkɔ akɔ anim ne akyi a wode nhyɛso a ɛkɔ fam no so. Fa nhyɛso a emu nyɛ den di dwuma wɔ 280-grit ntwahonan no so. Sɛ wusi sɛnea opal layer no yɛ adwuma no si hɔ wie a, wubetumi agyae adwuma a wobɛyɛ wɔ soro no.

Opal no a Wɔtwa Na Wɔyɛ no Polishing:
Polishing ntwahonan fi ase wɔ 120 grit diamond sen rɔba ntwahonan 400 grit / 600 grit / 1400 grit ansa na polish a etwa to.
1. Dop Ɔpanyin no
Nea edi kan no ɛsɛ sɛ yɛde ɔbo no kɔ dop dua bi so. Sɛ ɔbo no wɔ dop stick no so a ɛnyɛ den sɛ wobɛdannan no na woayɛ no sɛnea ɛte. Fa 220-grit wheel no di dwuma na ma ne nne a ɛwɔ akyi no yɛ petee. Akwan abien a wɔtaa fa so dop opal ne sɛ wɔde Glue bedi dwuma anaasɛ wɔde wax bedi dwuma.

2. Glue a wɔde hyɛ mu
Ɛsɛ sɛ ɔbo no ase ho tew na ɛyow. Fa gluu biako anaa abien gu dop nnua no so. Di kan yɛ opal no hyew denam nea wode bɛto dop kuku no hye so a ɛnboro sikɔne 30 so.
Fa nhyɛso a emu nyɛ den pia opal no kɔ dop dua no mu. Glue no bɛyow wɔ bɛyɛ simma 30 akyi. 
3. Wax a wɔde yɛ nneɛma
Sɛ opal no akyi fã yɛ spongy na gluu no ntumi nyɛ adwuma a wubetumi de wax adi dwuma sɛ ɔkwan foforo. Fa Opal no hyew na fa wax a ayɛ hyew gu opal no so ansa na wode ahyɛ dop sticks no so. Ɛsɛ sɛ wohwɛ hu sɛ dop nnua no wɔ wax a wɔanwene dodow a ɛdɔɔso wɔ so.

2. Siesie Wo Nsuo Nhyehyɛe
Eyi ne anammɔn a wubetumi atwa opal no. Sɛ wode afiri bi a ɛsan de ne nsu di akɔneaba te sɛ nsu a wɔde petepete ntwahonan no so no redi dwuma a, wubetumi atɔ fam akɔ kyɛnsee mu, afei wɔahyɛ wo afi saa kyɛnsee no mu na woapetepete ntwahonan no so prɛko bio. Sesa nsu no na ma nkuku no nyɛ fĩ daa.

3. Pre-Form - Yɛ Gyinaesi ahorow no
Saa bere yi de, wɔhwehwɛ sɛ wusi gyinae atitiriw bi. Hwɛ sɛnea wo bo no te wɔ ɔkwan a ɛkɔ akyiri so, dade abo ne opal nyinaa. Wɔn a wɔaka abom no betumi ayɛ fɛ kakra.
Kɔ so yi dade abo fi hɔ denam 600-grit ntwahonan no so. Susuw sɛnea wobɛma ɔbo no akɔ so atu ho. 600-grit wheel no da so ara tumi tew opal so na ɛma nsensanee ne nsensanee a ɛyɛ torotoro. Wubetumi ayɛ nneɛma pii wɔ saa fã a wotwa yi mu. Woreyi nsensanee a ɛwɔ afã horow a atwam no mu afi hɔ.
Afei, dade abo a wobeyi afi soro, na wɔakyekye ɔbo no ani ne sɛnea ɛte no yɛ nea ɛyɛ anigye ma aniwa. Hwɛ wo bo no mu na hwɛ nea ɛkyerɛ wo. Ebia wobɛhwehwɛ sɛ wosan kɔ ntwahonan a ɛwɔ 280-grit no akyi na wosakra ne su. Sɛ wuyi nsensanee akɛse no fi hɔ na w’ani gye sɛnea wohwɛ no ho wie a, kɔ 1200-grit ntwahonan no so.

4. FinalizeThe Shape Na Da Opal No adi
Wɔ saa anammɔn yi mu no, ɛkame ayɛ sɛ ntwahonan a ɛwɔ 1200-grit no beyi nsensanee a wotumi hu nyinaa afi hɔ. Ɛrenyɛ pii mfa nsakra wo bo no su, nanso ebetumi ama ne su ayɛ papa. Fa nhyɛso a ɛfata di dwuma na hwɛ hu sɛ ɔbo no kɔ so tu.
Gyina daa na siesie wo bo no na ama woahwɛ sɛnea nkɔso no aba na woahwɛ ahu sɛ nsensanee no ayera koraa.
Sɛ wuyi nsensanee a ɛda adi no fi hɔ wie a, dan kɔ 3000-grit wheel no so, anaasɛ sɛ womfa 3000-grit wheel nni dwuma a, fi ase siesie wo bo no. Sɛ wo mfiri no yɛ ntwahonan a ɛwɔ 14,000-grit a, ɛyɛ papa sɛ worentwitwa boulder opal. Saa ntwahonan yi taa fi ase denam nsensanee so.
5. Polish kasa a etwa to
Ɔfã a edi hɔ ne ɔkwan a wɔfa so yɛ polishing. Sɛnea ɛbɛyɛ a ɛbɛhyerɛn no, wubetumi de tin oxide asiesie aboa nhoma a ɛyɛ mmerɛw a wɔde foam ayɛ no. Fa nsuo guu mu kakra kɛkɛ denam toa a wɔde petepete so a wode bedi dwuma ne afiri a wɔde tu mmirika no a ɛretu mmirika na ɛretwintwam no so.
Afei nso, fa brɔs fa nsu ne tin oxide a wɔaka abom yiye gu pad a ɛyɛ nwini no so. Efi ha no, nsu a wɔde afrafra no nso, ɛsɛ sɛ tin oxide no yɛ teateaa sɛnea ɛbɛyɛ a ɛrenkyekyere, na ɛwɔ biakoyɛ a ɛte sɛ gravy a ɛyɛ tratraa.

Ma opals no nkɔ so kanyan kɛkɛ denam dop stick no a wobɛdannan wo nsateaa ntam ne sɛnea wobɛsakra baabi a pad no wɔ no so. Mma opal no nnyɛ hyew dodo. Ɛtɔ da bi a, aboa nhoma a ɛyɛ mmerɛw no betumi akyere wo bo no na atwe afi wo nsam. Mpɛn pii no, eyi ba esiane sɛ pad no ayow anaasɛ sɛ ɔbo no so yɛ toro anaasɛ n’afã horow mpo yɛ nsensanee nti.

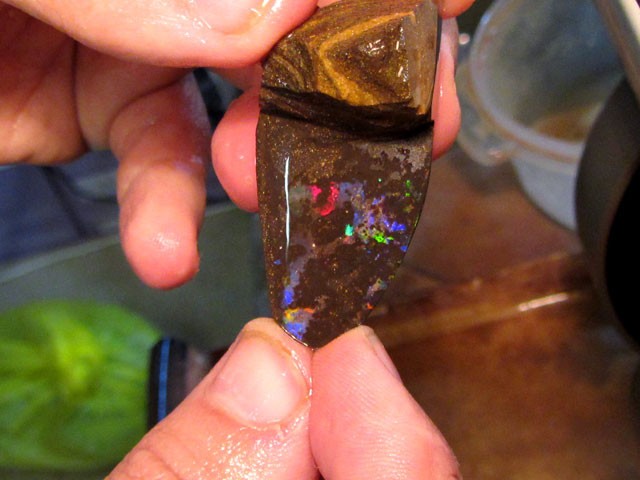
6. Nsɛm a Wɔakyerɛw Wɔ Matrix Boulder opal
sɛ wo si gyinae sɛ wobɛpopa matrix opal a, wubetumi adi adeyɛ koro no ara akyi. Mpɛn pii no, opal no yɛ nea ɛyɛ fɛ, nanso dade abo a ɛwɔ mu no bɛyɛ nwunu. Ɔkwan a ɛboa ne sɛ wobɛhohoro opal no ho sɛnea wɔakyerɛkyerɛ mu no, na afei woama pad no ma ayow kakra. Fa ahoɔden pii di dwuma bere a worekɔ so atu ɔbo no, sɛnea ɛbɛyɛ a wubetumi ate ɔbo no nka ma ayɛ hyew mpo.
Kae sɛ woresiesie matrix no, na ɛnyɛ wo bo no opal nsensanee no. Hwɛ yiye bere a woreyɛ ɔbo no hyew wɔ wo polishing pad no ho, a ebetumi ama matrix no awie no, nanso yɛ, kae sɛ ɔhyew pii betumi abubu opal no. Ɛsɛ sɛ wɔde saa kwan yi di dwuma kakra, nanso nea ebefi mu aba no betumi ayɛ nea mfaso wɔ so.
7. Wie Ɔbo no Akyi
Nea etwa to no wubetumi ayɛ akyi no awiei. Sɛ wowie polishing a, fa ɔbo no fi ne dop stick no mu. Wubetumi de hann a ɛyɛ gyinapɛn nhyɛso adi dwuma bɛyɛ bɛyɛ 220-280 ama wo grit ntwahonan no sɛnea ɛbɛyɛ a wubeyi doping ade no nkae biara afi mu.
Ɛsɛ sɛ woma ɔbo no yɛ petee wɔ ntwahonan no ho, nanso dannan no kakra sɛnea ɛbɛyɛ a wɔrensɛe n’akyi. Saa bere yi de, paw nea wopɛ ma ɔbo no kɛse pɔtee. Bere a wuduu hɔ a ne kɛse fata no, fa 220 anaa 280-grit no gu ntwahonan no so a ebetumi aboa ma ayɛ mmerɛw sɛ ɛbɛpae bere a wode asi hɔ no.
Wubetumi asusuw sɛ opal no awie, anaasɛ wubenya hwɛ a wɔawie denam akyi a wode bɛfa nkɔnsɔnkɔnsɔn a aka a ɛyɛ ntwahonan a ɛyɛ fɛ no mu no so. Ɛsɛ sɛ wode ntwahonan a ne kɛse yɛ 1200 anaa 3000 twa abo no akyi fã.
8. Nneɛma a Wɔawie
Bere a wɔatwitwa opals no nyinaa na wɔayɛ no fɛfɛɛfɛ awie no wobetumi ahyehyɛ no na wɔayɛ no ntoatoaso.
Abotan opals yɛ pendants akɛse. Nea ehia ara ne drill press a ɛbɛma tokuru akɔ wɔn ano. Thread through a leather strap na wowɔ wo ho ɔbotan fɛfɛ Opal kɔnmuade.

Afotu a Ɛyɛ Nsa a Efi Opal Cutter Mu
Wohaw wo ho sɛ wode nsa a ɛyɛ nsu bɛdan wo mfiri no na woadum? Bɔ mmɔden na fa gluu hyehyɛ dop stick wɔ power board switch no so. Saa kwan no so no, biribiara a ɛyɛ nsu ntumi nkɔ anyinam ahoɔden mu da. Adenim.

Sotɔɔ Ma Boulder Rough

搜尋Opal Encyclopedia
相關拍賣


相關文章
Boulder Opal yɛ opal a ne bo nyɛ den a ɛsom bo wɔ gua so no mu biako. Sua pii fa opal soronko yi ho na hwehwɛ abo a ɛyɛ fɛ a yɛwɔ a yɛtɔn no mu.
29th May 2019
Esiane sɛ Wayne ne Estella Sedawie ani gye opals ho nti, wɔde Opal Plus sii hɔ bɛboro mfe 14 a atwam ni na wɔahu sɛ intanɛt yɛ adwinnade a ɛsom bo. Ɛhɔ na adwumakuw no amanaman ntam nkitahodi dodow no ara kɔ so.
17th Oct 2018
Ɔbo a wɔde yɛ October no ne aboɔden abo a yɛpɛ paa, Opal. efi Black Opals, Mexico Opals ne Ethiopian Opals nyinaa yɛ soronko te sɛ nnipa a wɔwoo wɔn wɔ October mu no
3rd Oct 2019
最新的文章
Atoro opal a AI ayɛ no reyɛ ayɛ ma wɔ sohyial media so. Wayne Sedawie da sɛnea nsisifo yɛ adwuma ne nea ɛsɛ sɛ adetɔfo biara hu na ama wanya ahobammɔ adi.
20th Apr 2026
Black opals ne opal ahorow a wɔhwehwɛ sen biara, na ne nnyinaso a emu dɔ ma nyankontɔn a ɛyɛ hann wɔ soro. Hu sɛnea wɔde opal tuntum di dwuma, ne su, abakɔsɛm, ne bo a ɛsom!
7th Dec 2025
Hu sɛnea wɔde opal ahorow hyehyɛ mu ne nneɛma a ɛka ne bo. Efi kɔla ne hann so kosi nea wɔatwa ne nea efi mu ba so, sua sɛnea wɔbu opal ahorow biara bo - a nhwɛso ne bo ahorow.
19th Jul 2023
文章類別
All there is to know about Opals including Black Opals, Ethiopian Opals & Boulder Opal
14文章
Check out our fascinating information and articles on all things amazing in the Opal world
41文章