How To Cut And Polish Boulder Opal
 In this guide we will show you some top tricks to cutting Australian Boulder Opal. Boulder opal is opal that has a hard backing made of Ironstone with precious opal. The precious opal can be a thin layer on top of the Ironstone or it can be intertwined within the Ironstone.
Australian boulder opal from Queensland is a fascinating stone. Cutting boulder opals is a challenge but the results are usually breathtaking because the material is so hard it is difficult to make a cutting mistake so this type of material is good for novice cutters as well as experienced cutters.
Lets get stuck into a basic overview on how to cut and polish boulder opal.

Equipment you Will Need:
- Dop sticks
- Dop wax or strong glue
- Trim saw with thin
- Blade (with rim thickness approximately 0.02”)
- Diamond grinding wheels 80, 220, 600, 1200, and 3000 grits
- Cutting equipment
- Rough leather
- Polishing disk
- Tin oxide polish
- Lamp with 100-watt bulb
- Safety glasses
- Dust mask
- Old work clothes
- Water supply


Preparation Of The Rough Material:
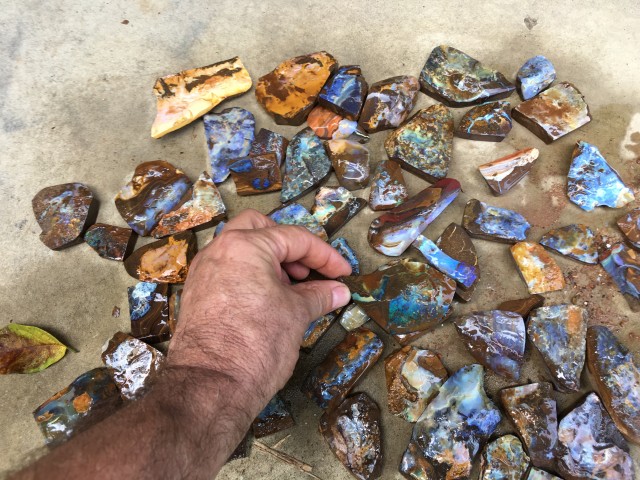
1. Hand Pick Your Opals
Pick out the days work of opals you wish to polish. It is more efficientto cut multiple stones atthe same time as you will only need toset-upthe machine once. Selecting boulder opal to work with is a skill in itself. Like working with any other rough material the more you know the better. Make sure that the ironstone around the opal is fairly strong and free from cracks. Some reasonably low-grade material is good to start with. You might not end up with a beautiful stone but you can develop your systematic skill enough that you will be capable of cutting that attractive stone in any way you want.


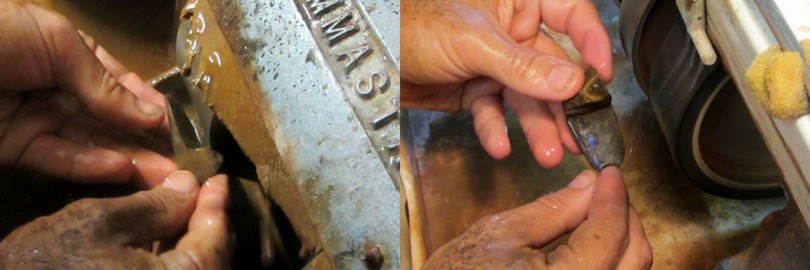
2. Study The Opal And Saw It Up
Look for the pattern of the ironstone to provide you some clues about the path in which the seam will run. When Opal occurs in ironstone, it has flat and straight parallel lines along the matrix. There is a better chance that the opal will track this line.If the rough is soaked in water let it dry first so you can see where the Opal is running. Check for cracks running across the stone and again look for any imperfections throughout the stone. If there are cracks running through the stone you can use the saw to split the opal down the crack. This will avoid any problems later on.
Most of the rough material you will buy has already been slabbed up so you can clearly see the Opal layer. If they material iscompletelyrough and you cannot easily see the Opal you will need to saw the stone to expose the Opal layer.
The saw blade should always be under water. Use plenty of water to keep the dust down and the Opal cool. Never cut dry as opal will heat quickly and crack.

3. Use Coarse Cutting Wheel To Remove Material
Now is the fun part. You will need a set of old clothes because it’s going to get dirty. Now that you have a fair idea of the course in which the seam will run it is time to rub it down. Having a combination of 80 and 220 grit wheel can make rubbing down the Opal much easier. use the coarse grit wheel to remove material quickly. Try not to get too close to the line of opal. The layer of opal can be unpredictable so try and stay just above the layer.
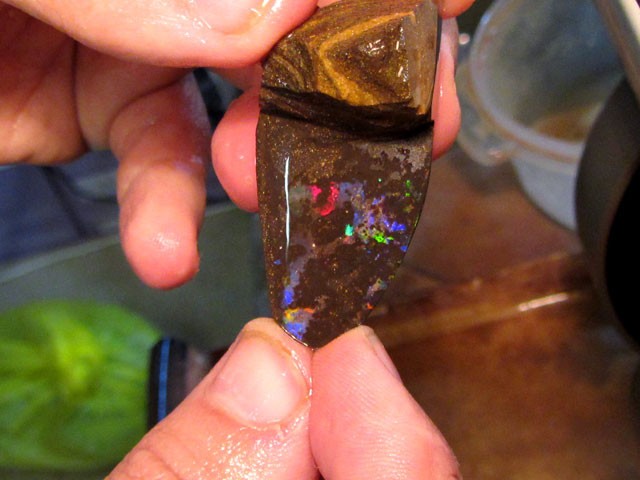
4. Study And Familiarize Yourself With The Opal
Now it is time to familiarize the Opal. You must decide which surface is going to be the top. Base your judgement on the form and layer of the opal, the coloring, brightness, and width of the surrounding material.
Try to make sure that the material directly below the Opal is as dark as possible. This dark setting will create the colors of the opal to stand out. If there is a thin cover of dark potch between the row of Opal and the ironstone it will make the stone pop. You must try to cut the stone so that this black coating will give the backdrop for your stone.
This kind of stone is referred to as a black boulder and can be quite radiant. It is also important that the boulder opal consists of a solid base. If the ironstone on other surface of opal is too lean, it will not offer the strength that is needed for the bottom of your stone.

5. Rub Away The Ironstone
Now that you know which way the opal will face use the 220 and 280 grit wheel. You must not come into contact with the opal once you decided to use the 220-grit wheel as it can rapidly eliminate quite a bit of the vibrant materials.
It is also advisable to use light pressure ranging from 220-grit wheel as you getting closer to the opal. You must keep on eliminating ironstone until you are just about to display opal in one part of the surface. Occasionally, before you reach the opal, you will even notice that the color of the ironstone will change.
6. Rub Down To Expose The Opal
Switch over to the 600-grit wheel in order to expose some opal. At this period, you are not trying to eliminate all of the ironstone from the surface. You can do it by going back and forth between the 600-grit wheel with medium pressure. Use light pressure on the 280-grit wheel. Once you establish how the layer of opal operates, you can stop working on the top.

Cutting And Polishing the Opal:
Polishing wheels start at 120 grit diamond than rubber wheels 400 grit / 600 grit / 1400 grit before final polish.
1. Dop The Opal
First we need to get the stone onto a dop stick. When the stone is on the dop stick it is easier to manoeuvre and shape. Use the 220-grit wheel and flatten its reverse side tone. The two most common ways to dop an opal is with Glue or using wax.

2. Glue
The base of the stone must clean and dry. Apply one or two drops of glue to the dop sticks. Pre-heat the opal by resting it on the border of the dop pot for not more than 30 seconds.
Use light pressure to push the opal into the dop stick. The glue will dry after about 30 minutes.

3. Wax
If the reverse side of the opal is spongy and the glue does not work you may use wax as an alternative. Heat the Opal and drop melted wax onto the opal before applying it the dop sticks. You must make sure the dop sticks have a sufficient amount of melted wax on them.

2. Setup Your Watering System
This is the step where you can cut the opal. If you’re using a device that re-circulates its water such as the water that is sprayed up onto the wheels, you can dripped down into a pan, then forced from that pan and sprayed up onto the wheels once more. Change the water and make the pans dirt-free regularly.

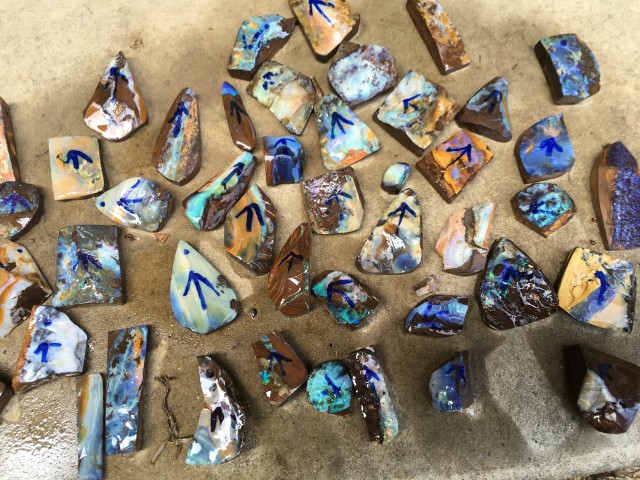
3. Pre-Form - Make The Decisions
At this point you are require to make some significant decisions. Look at the general appearance of your stone, both the ironstone and opal. Their combination can be relatively beautiful.
Keep on eliminating ironstone with the 600-grit wheel. Think about keeping the stone moving. The 600-grit wheel can still reduce opal and create smooth spots and scrapes. You can do a lot of things during this stage of cutting. You are eliminating scratches from previous stages.
Then, eliminating ironstone from the surface, and building the surface and form of the stone is pleasing to the eye. Check your stone and observe what it shows you. You might require going back the 280-grit wheel and changing its form. Once you have eliminated the big scratches and are pleased with the look, go to the 1200-grit wheel.

4. FinalizeThe Shape And Expose The Opal
In this step, the 1200-grit wheel will eliminate almost all noticeable scratches. It will not do much to modify the form of your stone, but it can better its form. Use reasonable pressure and make sure the stone is continually moving.
Stop regularly and clean up your stone to verify the progress and ensure that the scratches are completely vanishing.
Once you have removed the noticeable scratches, shift to the 3000-grit wheel, or if you’re not using a 3000-grit wheel, begin to clean your stone. If your device consists of a 14,000-grit wheel, it is advisable not to cut boulder opal. This wheel begins often with scratches.
5. Final Polish
The next phase is the process of polishing. In order to make it shine, you can use tin oxide for cleaning the foam-backed rough leather pad. Just lightly soaked it with water through the use of a spray bottle and with the running device running and spinning pad.
Also, use a brush to apply a well-stirred combination of water and tin oxide onto the moist pad. From here, the water mixture as well as, the tin oxide must be thin enough so that it does not clomp, and has the uniformity of thin gravy.

Just keep the opals stirring by turning the dop stick between your fingers and by varying the position of the pad. Do not allow the opal to get too hot. Sometimes, the coarse leather pad can seize your stone and pull it out of your hands. This is usually because the pad has dried out or if the stone has a rough surface or even pointed edges.

6. A Note On Matrix Boulder opal
if you are decide to polish a matrix opal, you can pursue the same process. The opal usually polishes, but the ironstone matrix will be dry. A helpful method is to clean the opal as explained, and then permit the pad dry faintly. Use more force while you maintain the stone moving, so that you can sense the stone to get even warm.
Remember that you are cleaning the matrix, not the opal spots of your stone. Be careful while heating the stone along your polishing pad, which can develop the finish of the matrix, but be, reminded that too much heat can break the opal. This method needs a bit of practice, but the outcomes can be worth it.
7. Finish The Back Of The Stone
Lastly you can do the finishing of the back. When you are completed polishing take the stone from its dop stick. You can use light to standard pressure for roughly about 220-280 for your grit wheel in order to take out any residue of the doping matter.
You must keep the stone flat against the wheel, but turn it slightly so that scratches will be avoided on its back. At this point, select what you prefer for the specific size of the stone. When you arrived with the suitable thickness, apply the 220 or 280-grit for the wheel that can be help to minimize chipping when setting.
You can either think the opal completed, or get a more finished look by taking the back through the remaining chain of finer wheels. You must cut the back portion of stones by means of 1200 or 3000-grit wheels.
8. The Finished Product
After all of the opals have been cut and polished they can be sorted and graded.
Boulder opals make great pendants. All that is needed is a drill press to create a hole in the tip of them. Thread through a leather strap and you have yourself a beautiful boulder Opal necklace.

A Handy Tip From An Opal Cutter
Worried about turning your machine on and off with wet hands? Try and glue a dop stick to the power board switch. That way nothing wet ever comes in contact with electricity. Brilliant.

Shop For Boulder Rough

Was this article helpful?


Wayne Sedawie
- Written - 5th Jan 2013
- Edited - 3rd Jan 2023
Comments

Love this place.

Tks so much ,very helpful ! I start with confidence !
Wayne Sedawie
- Written - 5th Jan 2013
- Edited - 3rd Jan 2023
Related Auctions


Related categories Cut Opal Stone Auctions, Boulder Opal And Gemstone Necklace and Opal And Peridot Earrings
Related Articles
-
How Does The Back Of An Opal And Its Cut Determine The Value Of An Opal?
24th Jan 2024Opal buyers always ask about the strength and durability of...
-
What Is A Cabochon And Why Are Opals Cut Like This?
4th Jan 2023When you look at a gemstone you might not immediately...
-
How To Cut Ethiopian Opal
4th Jan 2023Ethiopian opal is cut and polished in a similar method...
-
How To Cut Black Opal
4th Jan 2023This is a great guide for cutting black opal this...
-
How To Cut A Slab Opal
4th Jan 2023Every now and then an opal miner will find such...
Latest Articles
-
What Is The Best Opal Rough To Learn Opal Cutting And Polishing?
24th Apr 2024This article is written to help cutters of all skill...
-
Hydrophane Opal Information
18th Apr 2024Hydrophane opal is a new term that has been developed...
-
How to Care for Opal Jewelry
24th Mar 2024Opal jewelry has been popular for centuries but we still...
-
360 Degree Opal Mine Tours
24th Mar 2024Have you ever wondered what it s like being underground...
-
Is Opal a Mineral or Mineraloid? Learn How To Classify Opals!
18th Mar 2024In the fascinating world of gemstones there are two types...


Did you know?


Opal Auctions Verified Sellers


